ploeh blog danish software design
Type Driven Development: composition
When you develop a system with an outside-in technique like Type Driven Development, you'll eventually have all the required building blocks. Now you need to compose them into an application. This post shows an example.
In my article about Type Driven Development, I demonstrated how to approach a problem in an iterative fashion, using the F# type system to do outside-in development, and in a follow-up article, I showed you how to implement one of the inferred methods. In this article, you'll see how to compose all the resulting building blocks into an application.
Building blocks #
In the first article, you learned that apart from the functions defined in that article itself, you'd need four other functions:
- ReadyData -> bool
- unit -> Timed<MessageHandler option>
- NoMessageData -> bool
- unit -> Timed<'a>
As you can see in my Type-Driven Development with F# Pluralsight course, some of the other implementations turn out to have function arguments themselves. It's not quite enough with only those four functions. Still, the final number of implementation functions is only 9.
Here are all the building blocks (excluding the types and functions related to Timed<'a>):
- run : (PollingConsumer -> PollingConsumer) -> PollingConsumer -> PollingConsumer
- transition : (ReadyData -> bool) -> (unit -> Timed<MessageHandler option>) -> (NoMessageData -> bool) -> (unit -> Timed<'a>) -> PollingConsumer -> PollingConsumer
- shouldIdle : TimeSpan -> DateTimeOffset -> NoMessageData -> bool
- idle : TimeSpan -> unit -> Timed<unit>
- shouldPoll : (TimeSpan list -> TimeSpan) -> DateTimeOffset -> ReadyData -> bool
- poll : (unit -> 'a option) -> ('a -> 'b) -> (unit -> DateTimeOffset) -> unit -> Timed<MessageHandler option>
- calculateExpectedDuration : TimeSpan -> TimeSpan list -> TimeSpan
- simulatedPollForMessage : Random -> unit -> unit option
- simulatedHandle : Random -> unit -> unit
Composition #
When the Polling Consumer starts, it can start by figuring out the current time, and calculate some derived values from that and some configuration values, as previously explained.
let now' = DateTimeOffset.Now
let stopBefore' = now' + TimeSpan.FromMinutes 1.
let estimatedDuration' = TimeSpan.FromSeconds 2.
let idleDuration' = TimeSpan.FromSeconds 5.
The estimatedDuration' value is a TimeSpan containing a (conservative) estimate of how long time it takes to handle a single message. It's only used if there are no already observed message handling durations, as the algorithm then has no statistics about the average execution time for each message. This value could come from a configuration system, or a command-line argument. In a recent system, I just arbitrarily set it to 2 seconds.
Given these initial values, we can compose all other required functions:
let shouldPoll' =
    shouldPoll (calculateExpectedDuration estimatedDuration') stopBefore'

let r' = Random()
let handle' = simulatedHandle r'
let pollForMessage' = simulatedPollForMessage r'
let poll' = poll pollForMessage' handle' Clocks.machineClock

let shouldIdle' = shouldIdle idleDuration' stopBefore'

let idle' = idle idleDuration'

let transition' = transition shouldPoll' poll' shouldIdle' idle'
let run' = run transition'
The composed run' function has the type PollingConsumer -> PollingConsumer. The input PollingConsumer value is the start state, and the function will return another PollingConsumer when it's done. Due to the way the run function is implemented, this return value is always going to be StoppedState.
Execution #
All that's left to do is to execute the run' function with a ReadyState as the initial state:
let result' = run'(ReadyState([] |> Timed.capture Clocks.machineClock))
A ReadyState value is required as input, and the ReadyState case constructor takes a ReadyData value as input. ReadyData is an alias for Timed<TimeSpan list>. An the beginning, the Polling Consumer hasn't observed any messages, so the TimeSpan list should be empty.
The empty TimeSpan list must be converted to Timed<TimeSpan list>, which can be done by piping it into Timed.capture, using the machine clock.
When you execute the run' function, it may produce output like this:
Polling
Sleeping
Polling
Sleeping
Polling
Handling
Polling
Sleeping
Polling
Sleeping
Polling
Sleeping
Polling
Handling
Polling
Sleeping
Polling
Sleeping
Polling
Sleeping
Polling
Sleeping
Polling
Handling
Polling
Handling
Polling
Sleeping
Real: 00:00:59.392, CPU: 00:00:00.031, GC gen0: 0, gen1: 0, gen2: 0
This is because I set up some of the functions to print to the console so that we can see what's going on.
Notice that the state machine ran for 59 seconds and 392 milliseconds, exiting just before the minute was up.
Summary #
Once you have all the appropriate building blocks, you can compose your desired system and run it. Notice how much this resembles the Composition Root pattern, only with functions instead of objects.
If you want to see more details about this example, or get access to the full source code, you can watch my Type-Driven Development with F# Pluralsight course. Please be aware that only certain subscription levels will give you source code access.
Type Driven Development: implementing shouldIdle
Type Driven Development is an outside-in technique. Once you have the overall behaviour defined, you need to implement the details. Here's an example.
In my article about Type Driven Development, I demonstrated how to approach a problem in an iterative fashion, using the F# type system to do outside-in development. With the overall behaviour in place, there's still work to be done.
From type inference of the higher-order functions' arguments, we know that we still need to implement functions with these signatures:
- ReadyData -> bool
- unit -> Timed<MessageHandler option>
- NoMessageData -> bool
- unit -> Timed<'a>
NoMessageData -> bool function. If you want to see how to implement the other three functions, you can watch my Type-Driven Development with F# Pluralsight course.
The NoMessageData -> bool function is defined as the shouldIdle argument to the transitionFromNoMessage higher-order function. The purpose of the shouldIdle function is to determine whether there's enough remaining time to idle.
Development #
Since we know the signature of the function, we can start by declaring it like this:
let shouldIdle (nm : NoMessageData) : bool =
Although it doesn't have to be called shouldIdle, in this case, I think the name is appropriate.
In order to determine if there's enough time left to idle, the function must know what time it is right now. Recall that, by design, PollingConsumer states are instantaneous, while transitions take time. The time a transition starts and stops is captured by a Timed<'a> value.
The nm argument has the type NoMessageData, which is an alias for Timed<TimeSpan list>. The Timed part contains information about when the transition into the No message state started and stopped. Since being in a state has no duration, nm.Stopped represents the time when shouldIdle executes. That's part of the solution, so we can start typing:
let shouldIdle (nm : NoMessageData) : bool =
    nm.Stopped
This doesn't yet compile, because nm.Stopped is a DateTimeOffset value, but the function is declared as returning bool.
If we imagine that we add the idle duration to the current time, it should gives us the time it'd be when idling is done. That time should be less than the time the Polling Consumer must exit:
let shouldIdle (nm : NoMessageData) : bool =
    nm.Stopped + idleDuration < stopBefore
This still doesn't compile because idleDuration and stopBefore are undefined, but this is easy to fix: promote them to arguments:
let shouldIdle idleDuration stopBefore (nm : NoMessageData) : bool =
    nm.Stopped + idleDuration < stopBefore
If you paid attention to the previous article, you'll notice that this is exactly the same technique I used for the transitionFromNoMessage function. Apparently, we're not done with outside-in development yet.
Type inference #
The function now compiles, and has the type TimeSpan -> DateTimeOffset -> NoMessageData -> bool.
Once again, I've used the trick of promoting an undefined value to a function argument, and let type inference take care of the rest. This also works here. Since nm.Stopped is a DateTimeOffset value, and we're adding something to it with the + operator, idleDuration has to be of a type that supports adding to DateTimeOffset. The only thing you can add to DateTimeOffset is a TimeSpan, so idleDuration is inferred to be a TimeSpan value.
When you add a TimeSpan value to a DateTimeOffset value, you get another DateTimeOffset value back, so the type of the expression nm.Stopped + idleDuration is DateTimeOffset. The entire return expression compares that DateTimeOffset value with the < operator, which requires that both the left-hand and the right-hand expressions have the same type. Ergo must stopBefore also be a DateTimeOffset value.
While we set out to implement a function with the type NoMessageData -> bool, we eventually created a function with the type TimeSpan -> DateTimeOffset -> NoMessageData -> bool, which isn't quite what we need.
Partial application #
The extra arguments can be removed again with partial function application. When the Polling Consumer application starts, it can easily calculate when it ought to stop:
let now' = DateTimeOffset.Now
let stopBefore' = now' + TimeSpan.FromMinutes 1.
This assumes that the Polling Consumer should run for a maximum of 1 minute.
Likewise, we can create an idle duration value:
let idleDuration' = TimeSpan.FromSeconds 5.
Here, the value is hard-coded, but it could have gone in a configuration file instead, or be passed in as a command-line argument.
Given these values, we can now partially apply the function:
let shouldIdle' = shouldIdle idleDuration' stopBefore'
Since we're not supplying the third NoMessageData argument for the function, the return value of this partial application is a new function with the type NoMessageData -> bool - exactly what we need.
Summary #
In this article, you saw how to approach the implementation of one of the functions identified with the outside-in Type Driven Development technique. If you want to see the other three functions implemented, a much more detailed discussion of the technique, as well as the entire code base with commit messages, you can watch my Type-Driven Development with F# Pluralsight course.
Type Driven Development
A strong type system can not only prevent errors, but also guide you and provide feedback in your design process.
Have you ever worked in a statically typed language (e.g. C# or Java), only to wish that you'd be allowed to focus on what you're doing, instead of having to declare types of arguments and create new classes all the time?
Have you, on the other hand, ever worked in a dynamic language (e.g. Javascript) and wished you could get static type checking to prevent a myriad of small, but preventable errors?
You can have the best of both worlds, and more! F#'s type system is strong, but non-obtrusive. It enables you to focus on the behaviour of the code you're writing, while still being statically typed.
Not only can it prevent syntax and usage errors, but it can even provide guidance on how to proceed with a given problem.
This is best explained with an example.
Example problem: simulate a continuously running process as a series of discrete processes #
A couple of years ago I had a very particular problem: I needed to simulate a continuously running task using a sequence of discrete processes.
In short, I needed to start a process (in reality a simple .exe file) that would act as a Polling Consumer, but with the twist that it would keep track of time. It would need to run for one minute, and then shut down so that an overall scheduler could start the process again. This was to guarantee that the process would be running on at most one server in a farm.
The Polling Consumer should pull a message off a queue and hand it to some dispatcher, which would then make sure that the message was handled by an appropriate handler. This takes time, so makes the whole process more complex.
If the Polling Consumer estimates that receiving and handling a message takes 200 milliseconds, and it's 100 milliseconds from shutting down, it shouldn't poll for a message. It would take too long, and it wouldn't be able to shut down in time.
My problem was that I didn't know how long it took to handle a message, so the Polling Consumer would have to measure that as well, constantly updating its estimates of how long it takes to handle a message.
This wasn't a harder problem that I could originally solve it in a highly coupled imperative fashion. I wasn't happy with that implementation, though, so I'm happy that there's a much more incremental approach to the problem.
A Finite State Machine #
The first breakthrough came when I realised that I could model the problem as a finite state machine:
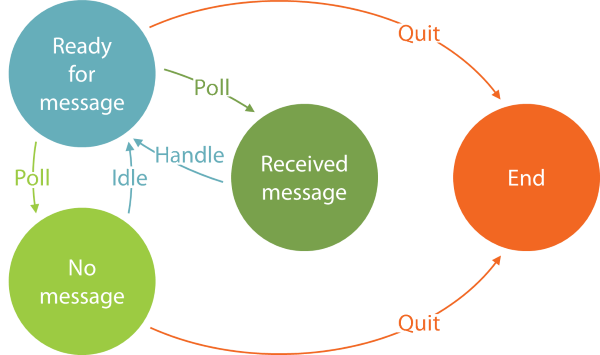
The implicit start state is always the Ready state, because when the Polling Consumer starts, it has no message, but plenty of time, so therefore ready for a new message.
From the Ready state, the Polling Consumer may decide to poll for a message; if one is received, the new state is the Received state.
From the Received state, the only legal transition is back into the Ready state by handling the message.
From the Ready state, it may also turn out that there's currently no message in the queue, in which case the new state is the No message state.
In the No message state, the Polling Consumer may decide to idle for perhaps five seconds before transitioning back into the Ready state.
When in the Ready or No message states, the Polling Consumer may also realise that time is running out, and so decide to quit, in which case the (final) state is the End state.
This means that the Polling Consumer needs to measure what it does, and those measurements influence what it decides to do.
Separation of concerns #
It sounds like we have a time concern (do I dare say dimension?), and a concern related to doing something. Given multiple concerns, we should separate them
The first thing I did was to introduce a Timed<'a> generic record type. This represents the result of performing a computation, as well as the times the computation started and stopped. I changed it slightly from the linked article, so here's the updated code for that:
type Timed<'a> =
    {
        Started : DateTimeOffset
        Stopped : DateTimeOffset
        Result : 'a
    }
    member this.Duration = this.Stopped - this.Started

module Untimed =
    let map f x =
        { Started = x.Started; Stopped = x.Stopped; Result = f x.Result }

    let withResult newResult x = map (fun _ -> newResult) x

module Timed =
    let capture clock x =
        let now = clock()
        { Started = now; Stopped = now; Result = x }

    let map clock f x =
        let result = f x.Result
        let stopped = clock ()
        { Started = x.Started; Stopped = stopped; Result = result }

    let timeOn clock f x = x |> capture clock |> map clock f
This enables me to capture timing information about any operation, including the transitions between various states in a finite state machine.
The way I modelled the finite state machine for the Polling Consumer explicitly models all states as being instantaneous, while transitioning between states takes time. This means that we can model all transitions as functions that return Timed<'something>.
State data types #
The first step is to model the data associated with each state in the finite state machine. This is an iterative process, but here I'll just show you the final result. If you're interested in seeing this design process in more details, you can watch my Pluralsight course Type-Driven Development with F#.
// Auxiliary types
type MessageHandler = unit -> Timed<unit>

// State data

type ReadyData = Timed<TimeSpan list>

type ReceivedMessageData = Timed<TimeSpan list * MessageHandler>

type NoMessageData = Timed<TimeSpan list>
All of these types are simply type aliases, so in fact they aren't strictly necessary. It's just helpful to give things a name from time to time.
The auxiliary MessageHandler type is a function that takes nothing (unit) as input, and returns 'timed nothing' as output. You may wonder how that handles a message. The intent is that any MessageHandler function is going to close over a real message: when a client calls it, it handles the message it closes over, and returns the time it took. The reason for this design is that the Polling Consumer doesn't need to 'see' the message; it only needs to know that it was handled, and how long it took. This design keeps the Polling Consumer decoupled from any particular message types.
There are three state data types: one for each state.
Hey! What about the End state?
It turns out that the End state doesn't need any associated data, because once the End state is reached, no more decisions should be made.
As promised, the three other states all contain a Timed<'something>. The timing information tells us when the transition into the given state started and stopped.
The data for the Ready and No message states are the same: Timed<TimeSpan list>, but notice that the TimeSpan list also appears in the Received state. This list of durations contains the statistics that the Polling Consumer measures. Every time it handles a message, it needs to measure how long it took. All such measurements are collected in this TimeSpan list, which must be passed around in all states so that the data isn't lost.
The data for the Received message state is different, because it also contains a MessageHandler. Every time the Polling Consumer receives a message, this message must be composed into a MessageHandler, and the MessageHandler passed as the second element of the state's tuple of data.
With all four states defined, we can now define a discriminated union that models a snapshot of the state machine:
type PollingConsumer =
| ReadyState of ReadyData
| ReceivedMessageState of ReceivedMessageData
| NoMessageState of NoMessageData
| StoppedState
That is, a PollingConsumer value represents a state of the Polling Consumer state machine.
Already at this stage, it should be apparent that F#'s type system is a great thinking tool, because it enables you to define type aliases declaratively, with only a single line of code here and there. Still, the advantage of the type system becomes much more apparent once you start to use these types.
Transitions #
With data types defined for each state, the next step of implementing a finite state machine is to define a function for each state. These functions are called transitions, and they should take a concrete state as input, and return a new PollingConsumer value as output. Since there are four concrete states in this example, there must be four transitions. Each should have the type 'concreteData -> PollingConsumer, e.g. ReadyData -> PollingConsumer, ReceivedMessageData -> PollingConsumer, etc.
As you can see, we're already getting guidance from the type system, because we now know the types of the four transitions we must implement.
Let's begin with the simplest one. When the Polling Consumer is Stopped, it should stay Stopped. That's easy. The transition should have the type unit -> PollingConsumer, because there's no data associated with the StoppedState.
Your first attempt might look like this:
let transitionFromStopped () : PollingConsumer = ??
This obviously doesn't compile because of the question marks (which aren't proper F# syntax). Knowing that you must return a PollingConsumer value, which one (of ReadyState, ReceivedMessageState, NoMessageState, or StoppedState) should you return?
Once the Polling Consumer is in the Stopped state, it should stay in the Stopped state, so the answer is easy: this transition should always return the Stopped state:
let transitionFromStopped () : PollingConsumer = StoppedState
It's as easy as that.
Since the (unit) input into the function doesn't do anything, we can remove it, effectively turning this particular function into a value:
let transitionFromStopped : PollingConsumer = StoppedState
This is a degenerate case, and not something that always happens.
Another transition #
Let's do another transition!
Another good example is the transition out of the No message state. This transition must have the type NoMessageData -> PollingConsumer, so you can start typing:
let transitionFromNoMessage (nm : NoMessageData) : PollingConsumer =
This function takes NoMessageData as input, and returns a PollingConsumer value as output. Now you only need to figure out how to implement it. What should it do?
If you look at the state transition diagram, you can see that from the No message state, the Polling Consumer should either decide to quit, or transition back to the Ready state after idling. That's the high-level behaviour we're aiming for, so let's try to put it into code:
let transitionFromNoMessage (nm : NoMessageData) : PollingConsumer =
    if shouldIdle nm
    then idle () |> ReadyState
    else StoppedState
This doesn't compile, because neither shouldIdle nor idle are defined, but this is the overall behaviour we're aiming for.
Let's keep it high-level, so we'll simply promote the undefined values to arguments:
let transitionFromNoMessage shouldIdle idle (nm : NoMessageData) : PollingConsumer =
    if shouldIdle nm
    then idle () |> ReadyState
    else StoppedState
This compiles! Notice how type inference enables you to easily introduce new arguments without breaking your flow. In statically typed languages like C# or Java, you'd have to stop and declare the type of the arguments. If the types you need for those arguments doesn't exist, you'd have to go and create them first. That'd often mean creating new interfaces or classes in new files. That breaks your flow when you're actually trying to figure out how to model the high-level behaviour of a system.
Often, figuring out how to model the behaviour of a system is an exploratory process, so perhaps you don't get it right in the first attempt. Again, with languages like C# or Java, you'd have to waste a lot of time fiddling with the argument declarations, and perhaps the types you'd have to define in order to declare those arguments.
In F#, you can stay focused on the high-level behaviour, and take advantage of type inference to subsequently contemplate if all looks good.
In the transitionFromNoMessage function, the shouldIdle argument is inferred to be of the type NoMessageData -> bool. That seems reasonable. It's a function that determines whether or not to idle, based on a NoMessageData value. Recall that NoMessageData is an alias for Timed<TimeSpan list>, and that all transition functions take time and return Timed<'something> in order to capture the time spent in transition. This means that the time data in NoMessageData contains information about when the transition into the No message state started and stopped. That should be plenty of information necessary to make the decision on whether there's time to idle or not. In a future article, you'll see how to implement a shouldIdle function.
What about the idle argument, then? As the transitionFromNoMessage function is currently written, this argument is inferred to be of the type unit -> ReadyData. Recall that ReadyData is an alias for Timed<TimeSpan list>; what we're really looking at here, is a function of the type unit -> Timed<TimeSpan list>. In other words, a function that produces a Timed<TimeSpan list> out of thin air! That doesn't sound right. Which TimeSpan list should such a function return? Recall that this list contains the statistics for all the previously handled messages. How can a function produce these statistics given nothing (unit) as input?
This seems extra strange, because the statistics are already there, contained in the nm argument, which is a NoMessageData (that is: a Timed<TimeSpan list>) value. The inferred signature of idle suggests that the statistics contained in nm are being ignored.
Notice how the type inference gives us an opportunity to contemplate the current implementation. In this case, just by looking at inferred types, we realise that something is wrong.
Instead, let's change the transitionFromNoMessage function:
let transitionFromNoMessage shouldIdle idle (nm : NoMessageData) =
    if shouldIdle nm
    then idle () |> Untimed.withResult nm.Result |> ReadyState
    else StoppedState
This seems more reasonable: the function idles, but then takes the timing information from idling, but replaces it with the statistics from nm. The inferred type of idle is now unit -> Timed<'a>. That seems more reasonable. It's any function that returns Timed<'a>, where the timing information indicates when idling started and stopped.
This still doesn't look like a pure function, because it relies on the side effect that time passes, but it turns out to be good enough for this purpose.
Higher-order functions #
Perhaps one thing is bothering you: I said that the transition out of the No message state should have the type NoMessageData -> PollingConsumer, but the final version of transitionFromNoMessage has the type (NoMessageData -> bool) -> (unit -> Timed<'a>) -> NoMessageData -> PollingConsumer!
The transitionFromNoMessage function has turned out to be a higher-order function, because it takes other functions as arguments.
Even though it doesn't exactly have the desired type, it can be partially applied. Imagine that you have two functions named shouldIdle' and idle', with the appropriate types, you can use them to partially apply the transitionFromNoMessage function:
let transitionFromNoMessage' = transitionFromNoMessage shouldIdle' idle'
The transitionFromNoMessage' function has the type NoMessageData -> PollingConsumer - exactly what we need!
All transitions #
In this article, you've seen two of the four transitions necessary for defining the behaviour of the Polling Consumer. In total, all four are required:
- ReadyData -> PollingConsumer
- ReceivedMessageData -> PollingConsumer
- NoMessageData -> PollingConsumer
- (StoppedData) -> PollingConsumer
In this article, I will leave it as an exercise to you to implement ReadyData -> PollingConsumer and ReceivedMessageData -> PollingConsumer. If you want to see full implementations of these, as well as a more detailed discussion of this general topic, please watch my Type-Driven Development with F# Pluralsight course.
Imagine that we now have all four transitions. This makes it easy to implement the overall state machine.
State machine #
Here's one way to execute the state machine:
let rec run trans state =
    let nextState = trans state
    match nextState with
    | StoppedState -> StoppedState
    | _ -> run trans nextState
This run function has the inferred type (PollingConsumer -> PollingConsumer) -> PollingConsumer -> PollingConsumer. It takes a trans function that turns one PollingConsumer into another, as well as an initial PollingConsumer value. It then proceeds to recursively call the trans function and itself, until it reaches a StoppedState value.
How can we implement a PollingConsumer -> PollingConsumer function?
That's easy, because we have all four transition functions, so we can use them:
let transition shouldPoll poll shouldIdle idle state =
    match state with
    | ReadyState r -> transitionFromReady shouldPoll poll r
    | ReceivedMessageState rm -> transitionFromReceived rm
    | NoMessageState nm -> transitionFromNoMessage shouldIdle idle nm
    | StoppedState -> transitionFromStopped
The transition function has the type (ReadyData -> bool) -> (unit -> Timed<messagehandler option>) -> (NoMessageData -> bool) -> (unit -> Timed<'a>) -> PollingConsumer -> PollingConsumer. That looks positively horrendous, but it's not so bad; you can partially apply it in order to get a function with the desired type PollingConsumer -> PollingConsumer.
Implicit to-do list #
Even though we now have the run and transition functions, we only have the high-level behaviour in place. We still have a lot of implementation details left.
This is, in my opinion, one of the benefits of this approach to using the low-friction type system: First, you can focus on the desired behaviour of the system. Then, you address various implementation concerns. It's outside-in development.
Another advantage is that at this point, it's quite clear what to do next.
The transitionFromNoMessage function clearly states that it needs the functions shouldIdle and idle as arguments. You can't call the function without these arguments, so it's clear that you must supply them.
Not only did the type system allow us to introduce these function arguments with low friction, but it also tells us the types they should have.
In my Pluralsight course you can see how the transition out of the Ready state also turns out to be a higher-order function that takes two other functions as arguments.
In all, that's four functions we still need to implement before we can use the state machine. It's not going to be possible to partially apply the transition function before these four functions are available.
The type system thereby tells us that we still need to implement these four functions:
- ReadyData -> bool
- unit -> Timed<MessageHandler option>
- NoMessageData -> bool
- unit -> Timed<'a>
run function. Once we can compile a composition of the run function, there are no implementation details left.
Summary #
Although this turned out to be quite a lengthy article, it only provides a sketch of the technique. You can see more code details, and a more in-depth discussion of the approach, in my Type-Driven Development with F# Pluralsight course.
The F# type system can be used in ways that C# and Java's type systems cant:
- Dependencies can be introduced just-in-time as function arguments.
- You can contemplate the inferred types to evaluate the soundness of the design.
- The type system implicitly keeps a to-do list for you.
Update 2017-07-10: See Pure times for a more functional design.
Idiomatic or idiosyncratic?
A strange programming construct may just be a friendly construct you haven't yet met.
Take a look at this fragment of JavaScript, and reflect on how you feel about it.
var nerdCapsToKebabCase = function (text) {
    var result = "";
    for (var i = 0; i < text.length; i++) {
        var c = text.charAt(i);
        if (i > 0 && c == c.toUpperCase()) {
            result = result + "-";
        }
        result = result + c.toLowerCase();
    }
    return result;
};
Do you understand what it does? Does it feel appropriate for the language? Does it communicate its purpose?
Most likely, you answered yes to all three questions - at least if you know what NerdCaps and kebab-case means.
Would your father, or your 12-year old daughter, or your English teacher, also answer yes to all of these questions? Probably not, assuming they don't know programming.
Everything is easy once you know how to do it; everything is hard if you don't.
Beauty is in the eye of the beholder #
Writing software is hard. Writing maintainable software - code that you and your team can keep working on year after year - is extraordinarily hard. The most prominent sources of problems seem to be accidental complexity and coupling.
During my career, I've advised thousands of people on how to write maintainable code: how to reduce coupling, how to simplify, how to express code that a human can easily reason about.
The most common reaction to my suggestions?
"But, that's even more unreadable than the code we already had!"What that really means is usually: "I don't understand this, and I feel very uncomfortable about that."
That's perfectly natural, but it doesn't mean that my suggestions are really unreadable. It just means that you may have to work a little before it becomes readable, but once that happens, you will understand why it's not only readable, but also better.
Let's take a step back and examine what it means when source code is readable.
Imperative code for beginners #
Imagine that you're a beginner programmer, and that you have to implement the nerd caps to kebab case converter from the introduction.
This converter should take as input a string in NerdCaps, and convert it to kebab-case. Here's some sample data:
| Input | Expected output |
|---|---|
| Foo | foo |
| Bar | bar |
| FooBar | foo-bar |
| barBaz | bar-baz |
| barBazQuux | bar-baz-quux |
| garplyGorgeFoo | garply-gorge-foo |
Since (in this imaginary example) you're a beginner, you should choose to use a beginner's language, so perhaps you select Visual Basic .NET. That seems appropriate, as BASIC was originally an acronym for Beginner's All-purpose Symbolic Instruction Code.
Perhaps you write the function like this:
Function Convert(text As String) As String
    Dim result = ""
    For index = 0 To text.Length - 1
        Dim c = text(index)
        If index > 0 And Char.IsUpper(c) Then
            result = result + "-"
        End If
        result = result + c.ToString().ToLower()
    Next
    Return result
End Function
Is this appropriate Visual Basic code? Yes, it is.
Is it readable? That completely depends on who's doing the reading. You may find it readable, but does your father, or your 12-year old daughter?
I asked my 12-year old daughter if she understood, and she didn't. However, she understands this:
Funktionen omformer en stump tekst ved at først at dele den op i stumper hver gang der optræder et stort bogstav. Derefter sætter den bindestreg mellem hver tekststump, og laver hele teksten om til små bogstaver - altså nu med bindestreger mellem hver tekststump.
Did you understand that? If you understand Danish (or another Scandinavian language), you probably did; otherwise, you probably didn't.
Readability is evaluated based on what you already know. However, what you know isn't constant.
Imperative code for seasoned programmers #
Once you've gained some experience, you may find Visual Basic's syntax too verbose. For instance, once you understand the idea about scope, you may find End If, End Function etc. to be noisy rather than helpful.
Perhaps you're ready to replace those keywords with curly braces. Here's the same function in C#:
public string Convert(string text)
{
    var result = "";
    for (int i = 0; i < text.Length; i++)
    {
        var c = text[i];
        if (i > 0 && Char.IsUpper(c))
            result = result + "-";
        result = result + c.ToString().ToLower();
    }
    return result;
}
Is this proper C# code? Yes. Is it readable? Again, it really depends on what you already know, but most programmers familiar with the C language family would probably find it fairly approachable. Notice how close it is to the original JavaScript example.
Imperative code for experts #
Once you've gained lots of experience, you will have learned that although the curly braces formally delimit scopes, in order to make the code readable, you have to make sure to indent each scope appropriately. That seems to violate the DRY principle. Why not let the indentation make the code readable, as well as indicate the scope?
Various languages have so-called significant whitespace. The most widely known may be Python, but since we've already looked at two .NET languages, why not look at a third?
Here's the above function in F#:
let nerdCapsToKebabCase (text : string) =
    let mutable result = ""
    for i = 0 to text.Length - 1 do
        let c = text.Chars i
        if (i > 0 && Char.IsUpper c) then
            result <- result + "-"
        result <- result + c.ToString().ToLower()
    result
Is this appropriate F# code?
Not really. While it compiles and works, it goes against the grain of the language. F# is a Functional First language, but the above implementation is as imperative as all the previous examples.
Functional refactoring #
A more Functional approach in F# could be this:
let nerdCapsToKebabCase (text : string) =
    let addSkewer index c =
        let s = c.ToString().ToLower()
        match index, Char.IsUpper c with
        | 0, _ -> s
        | _, true -> "-" + s
        | _, false -> s
    text |> Seq.mapi addSkewer |> String.concat ""
This implementation uses a private, inner function called addSkewer to convert each character to a string, based on the value of the character, as well as the position it appears. This conversion is applied to each character, and the resulting sequence of strings is finally concatenated and returned.
Is this good F#? Yes, I would say that it is. There are lots of different ways you could have approached this problem. This is only one of them, but I find it quite passable.
Is it readable? Again, if you don't know F#, you probably don't think that it is. However, the F# programmers I asked found it readable.
This solution has the advantage that it doesn't rely on mutation. Since the conversion problem in this article is a bit of a toy problem, the use of imperative code with heavy use of mutation probably isn't a problem, but as the size of your procedures grow, mutation makes it harder to understand what happens in the code.
Another improvement over the imperative version is that this implementation uses a higher level of abstraction. Instead of stating how to arrive at the desired result, it states what to do. This means that it becomes easier to change the composition of it in order to change other characteristics. As an example, this implementation is what is known as embarrassingly parallel, although it probably wouldn't pay to parallelise this implementation (it depends on how big you expect the input to be).
Back-porting the functional approach #
While F# is a multi-paradigmatic language with an emphasis on Functional Programming, C# and Visual Basic are multi-paradigmatic languages with emphasis on Object-Oriented Programming. However, they still have some Functional capabilities, so you can back-port the F# approach. Here's one way to do it in C# using LINQ:
public string Convert(string text)
{
    return String.Concat(text.Select(AddSkewer));
}

private static string AddSkewer(char c, int index)
{
    var s = c.ToString().ToLower();
    if (index == 0)
        return s;
    if (Char.IsUpper(c))
        return "-" + s;
    return s;
}
The LINQ Select method is equivalent to F#'s mapi function, and the AddSkewer function must rely on individual conditionals instead of pattern matching, but apart from that, it's structurally the same implementation.
You can do the same in Visual Basic:
Function Convert(text As String) As String
    Return String.Concat(text.Select(AddressOf AddSkewer))
End Function

Private Function AddSkewer(c As Char, index As Integer)
    Dim s = c.ToString().ToLower()

    If index = 0 Then
        Return s
    End If

    If Char.IsUpper(c) Then
        Return "-" + s
    End If

    Return s
End Function
Are these back-ported implementations examples of appropriate C# or Visual Basic code? This is where the issue becomes more controversial.
Idiomatic or idiosyncratic #
Apart from reactions such as "that's unreadable," one of the most common reactions I get to such suggestions is:
"That's not idiomatic C#" (or Visual Basic).
Perhaps, but could it become idiomatic?
Think about what an idiom is. In language, it just means a figure of speech, like "jumping the shark". Once upon a time, no-one said "jump the shark". Then Jon Hein came up with it, other people adopted it, and it became an idiom.
It's a bit like that with idiomatic C#, idiomatic Visual Basic, idiomatic Ruby, idiomatic JavaScript, etc. Idioms are adopted because they're deemed beneficial. It doesn't mean that the set of idioms for any language is finite or complete.
That something isn't idiomatic C# may only mean that it isn't idiomatic yet.
Or perhaps it is idiomatic, but it's just an idiom you haven't seen yet. We all have idiosyncrasies, but we should try to see past them. If a language construct is strange, it may be a friendly construct you just haven't met.
Constant learning #
One of my friends once told me that he'd been giving a week-long programming course to a group of professional software developers, and as the week was winding down, one of the participants asked my friend how he knew so much.
My friend answered that he constantly studied and practised programming, mostly in his spare time.
The course participant incredulously replied: "You mean that there's more to learn?"
As my friend told me, he really wanted to reply: “If that's a problem for you, then you've picked the wrong profession." However, he found something more bland, but polite, to answer.
There's no way around it: if you want to be (and stay) a programmer, you'll have to keep learning - not only new languages and technologies, but also new ways to use the subjects you already think you know.
If you ask me about advice about a particular problem, I will often suggest something that seems foreign to you. That doesn't make it bad, or unreadable. Give it a chance even if it makes you uncomfortable right now. Being uncomfortable often means that you're learning.
Luckily, in these days of internet, finding materials that will help you learn is easier and more accessible than ever before in history. There are tutorials, blog posts, books, and video services like Pluralsight.
Type Driven Development with F# Pluralsight course
The F# type system can do much more than C# or Java's type system. Learn how to use it as a design feedback technique in my new Pluralsight course.
Not only can the F# type system help you catch basic errors in your code, but it can also help you by providing rapid feedback, and make suggestions on how to proceed. All you have to do is learn to listen.
My new Pluralsight course, Type-Driven Development with F#, first walks you through three modules of exploration of a real problem, showing various ways you can take advantage of the type system in an Outside-in fashion. As you can tell, it involves some celebration related to Finite State Machines:

It then shows you how to stabilize the prototype using Property-based Testing with FsCheck.
REST implies Content Negotiation
If you're building REST APIs, you will eventually have to deal with Content Negotiation.
Some REST services support both JSON and XML, in which case it's evident that Content Negotiation is required. These days, though, more and more services forego XML, and serve only JSON. Does that mean that Content Negotiation is no longer relevant?
If you're building level 3 REST APIs this isn't true. You'll still need Content Negotiation in order to be able to evolve your service without breaking existing clients.
In a level 3 API, the distinguishing feature is that the service exposes Hypermedia Controls. In practice, it means that representations also contain links, like in this example:
{
"users": [
{
"displayName": "Jane Doe",
"links": [
{ "rel": "user", "href": "/users/1234" },
{ "rel": "friends", "href": "/users/1234/friends" }
]
},
{
"displayName": "John Doe",
"links": [
{ "rel": "user", "href": "/users/5678" },
{ "rel": "friends", "href": "/users/5678/friends" }
]
}
]
}
This representation gives you a list of users. Notice that each user has an array of links. One type of link, identified by the relationship type "user", will take you to the user resource. Another link, identified by the relationship type "friends", will take you to that particular user's friends: another array of users.
When you follow the "user" link for the first user, you'll get this representation:
{
"displayName": "Jane Doe",
"address": {
"street": "Any Boulevard 42",
"zip": "12345 Anywhere"
}
}
This user representation is richer, because you also get the user's address. (In a real API, this representation should also have links, but I omitted them here in order to make the example more concise.)
Breaking changes #
As long as you have no breaking changes, all is good. Things change, though, and now you discover that a user can have more than one address:
{
"displayName": "Jane Doe",
"addresses": [
{
"street": "Any Boulevard 42",
"zip": "12345 Anywhere"
},
{
"street": "Some Avenue 1337",
"zip": "67890 Nowhere"
}
]
}
This is a breaking change. If the service returns this representation to a client that expects only a single "address" property, that client will break.
How can you introduce this new version of a user representation without breaking old clients? You'll need to keep both the old and the new version around, and return the old version to the old clients, and the new version to new clients.
Versioning attempt: in the URL #
There are various suggested ways to version REST APIs. Some people suggest including the version in the URL, so that you'd be able to access the new, breaking representation at "/users/v2/1234", while the original representation is still available at "/users/1234". There are several problems with this suggestion; the worst is that it doesn't work well with Hypermedia Controls (links, if you recall).
Consider the list of users in the first example, above. Each user has some links, and one of the links is a "user" link, which will take the client to the original representation. This can never change: if you change the "user" links to point to the new representation, you will break old clients. You also can't remove the "user" links, for the same reason.
The only way out of this conundrum is to add another link for the new clients:
{
"users": [
{
"displayName": "Jane Doe",
"links": [
{ "rel": "user", "href": "/users/1234" },
{ "rel": "userV2", "href": "/users/v2/1234" },
{ "rel": "friends", "href": "/users/1234/friends" }
]
},
{
"displayName": "John Doe",
"links": [
{ "rel": "user", "href": "/users/5678" },
{ "rel": "userV2", "href": "/users/v2/5678" },
{ "rel": "friends", "href": "/users/5678/friends" }
]
}
]
}
In this way, old clients can still follow "user" links, and updated clients can follow "userV2" links.
It may work, but isn't nice. Every time you introduce a new version, you'll have to add new links in all the places where the old link appears. Imagine the 'link bloat' when you have more than two versions of a resource:
{
"users": [
{
"displayName": "Jane Doe",
"links": [
{ "rel": "user", "href": "/users/1234" },
{ "rel": "userV2", "href": "/users/v2/1234" },
{ "rel": "userV3", "href": "/users/v3/1234" },
{ "rel": "userV4", "href": "/users/v4/1234" },
{ "rel": "userV5", "href": "/users/v5/1234" },
{ "rel": "friends", "href": "/users/1234/friends" },
{ "rel": "friendsV2", "href": "/users/1234/V2/friends" }
]
},
{
"displayName": "John Doe",
"links": [
{ "rel": "user", "href": "/users/5678" },
{ "rel": "userV2", "href": "/users/v2/5678" },
{ "rel": "userV3", "href": "/users/v3/5678" },
{ "rel": "userV4", "href": "/users/v4/5678" },
{ "rel": "userV5", "href": "/users/v5/5678" },
{ "rel": "friends", "href": "/users/5678/friends" },
{ "rel": "friendsV2", "href": "/users/5678/V2/friends" }
]
}
]
}
Remember: we're talking about Level 3 REST APIs here. Clients must follow the links provided; clients are not expected to assemble URLs from templates, as will often be the case in Level 1 and 2.
Versioning through Content Negotiation #
As is often the case, the root cause of the above problem is coupling. The attempted solution of putting the version in the URL couples the identity (the URL) of the resource to its representation. That was never the intent of REST.
Instead, you should use Content Negotiation to version representations. If clients don't request a specific version, the service should return the original representation.
New clients that understand the new representation can explicitly request it in the Accept header:
GET /users/1234 HTTP/1.1 Accept: application/vnd.ploeh.user+json; version=2
Jim Liddell has a more detailed description of this approach to versioning.
It enables you to keep the user list stable, without link bloat. It'll simply remain as it was. This means less work for you as API developer, and fewer bytes over the wire.
Disadvantages #
The most common criticisms against using Content Negotiation for versioning is that it makes the API less approachable. The argument goes that with version information in the URL, you can still test and explore the API using your browser. Once you add the requirement that HTTP headers should be used, you can no longer test and explore the API with your browser.
Unless the API in question is an anonymously accessible, read-only API, I think that this argument misses the mark.
Both Level 2 and 3 REST APIs utilise HTTP verbs. Unless the API is a read-only API, a client must use POST, PUT, and DELETE as well as GET. This is not possible from a browser.
Today, many APIs are secured with modern authentication and authorisation formats like OAuth, where the client has to provide a security token in the Authorization header. This is not possible from a browser.
Most APIs will already be impossible to test from the browser; it's irrelevant that versioning via the Accept header also prevents you from using the browser to explore and test the API. Get friendly with curl or Fiddler instead.
Summary #
If you want to build a true REST API, you should seriously consider using Content Negotiation for versioning. In this way, you prevent link bloat, and effectively decouple versioning from the identity of each resource.
If you've said REST, you must also say Content Negotiation. Any technology you use to build or consume REST services must be able to play that game.
Comments
For that example, it's only a breaking change because you also removed the old "address" property. It might have been easier to leave that in and populate it with the first address from the collection. Older clients could continue to use that, and newer ones could use the new "addresses" field. Obviously at some point you will need to deal with versioning, but it can be better to avoid it until absolutely necessary.
I've been catching up on REST, and discovered the 5 levels of media type just a few minutes before reading your post. This keeps it approachable, you can still use your browser to explore, and the higher levels progressively enhance the API for smarter clients.
An example can be found here where Ali Kheyrollahi exposes Greg Young's CQRS sample though a REST inferface.
Graham, thank you for writing. You are completely right: if it's possible to evolve the API without introducing a new version, that's always preferable. Your suggestion for doing that with my particular example demonstrates how it could be done.
As you also correctly point out, sooner or later, one will have to deal with a truly breaking change. My purpose of writing this article was to explain how the need to do that implies that content negotiation is required. This is the reason I made up an example of a breaking change; unfortunately, that example didn't convince you that versioning was necessary ;)
I think I would consider going one step further, and mandate a version in the Accept header right from the beginning.
i.e., Accept: application/json would return a 406 Not Acceptable HTTP response. You have to use Accept: application/vnd.ploeh.user+json; version=1
Forces clients to be upgrade friendly to begin with, and easier to retire old versions when they are not being called any more.
It strikes me though, that having to know these MIME types for versioning is a bit like needing to know the right incantation to open the magic door. We don't want clients hard-coding the URL to a particular API call as part of HATEOAS, but still need to know the magic MIME type to get an appropriate version of the data.
Evan, thank you for writing. As I also wrote in a comment to Jim Liddel's article, I would consider the context before making any hard rules. If you control both API and all clients, requiring specific Accept headers may make managing the entire ecosystem a little easier.
On the other hand, if you make an API available to arbitrary clients, you should follow Postel's law in order to make it easy for client developers to use your API.
Ultimately, even if you can somehow solve the problem of not having to know specific MIME types, you'll still need to know how to interpret the representations served by the API. For example, as a client developer, you still need to know that a user representation will have displayName and address properties. As far as I can see, you can push that problem around, but if it can be solved, I've yet to learn how.
Mark, I've been doing some preliminary research on API versioning for a personal project and I like this approach. Thanks for the post and accompanying links!
I read a few of Jim Liddel's posts and can see that Nancy has this sort of content negotiation baked in. Being more familiar with Web Api, I've been looking for an existing way of doing this using that framework instead. Web Api's support for attribute routing seems promising, but as of yet, I haven't seen any examples of this in action using Web Api 2. The flexibility and simplicity of Nancy is really attractive, and I may end up going that route anyway, but I'm hesitant to pick a framework based solely on something like this. Have you come across anything similar for Web API 2?
Ben, thank you for writing. Web API has supported Content Negotiation since back when it was still a WCF Web API CTP. Out of the box it supports XML and JSON, but you can also make it support Content Negotiation-based versioning as described in this article.
stringf
stringf is an F# function that invokes any ToString(string) method.
F# comes with the built-in string function, which is essentially an adapter over Object.ToString. That often comes in handy, because it lets you compose functions without having to resort to lambda expressions all the time.
Instead of writing this (to produce the string "A, B, C, D, E, F, G, H, I, J, K, L, M, N, O, P, Q, R, S, T, U, V, W, X, Y, Z"):
['A' .. 'Z'] |> List.map (fun x -> x.ToString()) |> String.concat ", "
You can write this:
['A' .. 'Z'] |> List.map string |> String.concat ", "
That's nice, but some .NET types provide an overloaded ToString function taking a format string as argument:
- DateTimeOffset.ToString : format:string -> string
- DateTime.ToString : format:string -> string
- TimeSpan.ToString : format:string -> string
- Decimal.ToString : format:string -> string
While these methods can be useful, it would be nice to be able to use them as functions, like the string function. The problem, it seems, is that this ToString overload is part of no interface or base class.
Statically typed duck typing #
That's not a problem for F#, because it enables us to do statically typed duck typing!
In this case, you can define a stringf function:
let inline stringf format (x : ^a) = (^a : (member ToString : string -> string) (x, format))
You can use the function like this:
> DateTimeOffset.Now |> stringf "o";; val it : string = "2015-05-07T14:24:09.8422893+02:00" > DateTimeOffset.Now |> stringf "T";; val it : string = "14:24:18" > DateTime.Now |> stringf "t";; val it : string = "14:24" > TimeSpan.FromDays 42. |> stringf "c";; val it : string = "42.00:00:00" > 0.42m |> stringf "p0";; val it : string = "42 %"
Perhaps it would be better to define more domain-specific functions like percent, roundTrippable, time, etc., but it's interesting that such a function as stringf is possible.
Functional design is intrinsically testable
TDD with Functional Programming doesn't lead to test-induced damage. Here's why.
Over the years, there's been much criticism of Test-Driven Development (TDD). Perhaps David Heinemeier Hansson best condensed this criticism by claiming that TDD leads to test-induced design damage. This isn't a criticism you can just brush away; it hits a sore point.
Personally, I don't believe that TDD has to lead to test-induced damage (not even in Object-Oriented Programming), but I'm the first to admit that it's not a design methodology.
In this article, though, you're going to learn about the fundamental reason that TDD with Functional Programming doesn't lead to test-induced damage.
In Functional Programming, the ideal function is a Pure function. A Pure function is a function that always returns the same value given the same input, and has no side-effects.
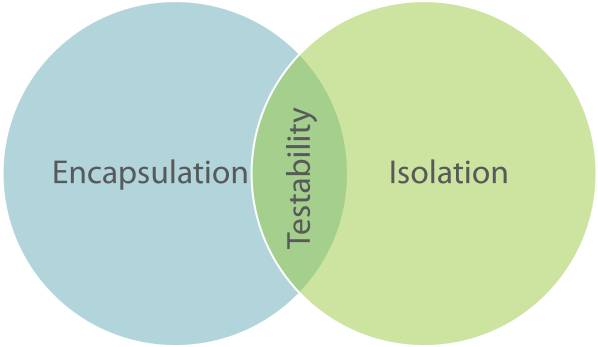
Isolation #
The first characteristic of a Pure function means that an ideal function can't depend on any implicit knowledge about the external world. Only the input into the function can influence the evaluation of the function.
This is what Jessica Kerr calls Isolation. A function has the property of Isolation when the only information it has about the external word is passed into it via arguments.
You can think about Isolation as the dual of Encapsulation.
In Object-Oriented Programming, Encapsulation is a very important concept. It means that while an object contains state, the external world doesn't know about that state, unless the object explicitly makes it available.
In Functional Programming, a function is Isolated when it knows nothing about the state of the external world, unless it's explicitly made available to it.
A Pure function, the ideal of Functional Programming, is Isolated.
Unit testing #
Why is this interesting?
It's interesting if you start to think about what unit testing means. There are tons of conflicting definitions of what exactly constitutes a unit test, but most experts seem to be able to agree on this broad definition:
A unit test is an automated test that tests a unit in isolation from its dependencies.Notice the use of the word Isolation in that definition. In order to unit test, you'll have to be able to isolate the unit from its dependencies. This is the requirement that tends to lead to Test-Induced Damage in Object-Oriented Programming. While there's nothing about Encapsulation that explicitly states that it's forbidden to isolate an object from its dependencies, it offers no help on the matter either. Programmers are on their own, because this concern isn't ingrained into Object-Oriented Programming.
You can do TDD with Object-Oriented Programming, and as long as you stay within the intersection of Encapsulation and Isolation, you may be able to stay clear of test-induced damage. However, that zone of testability isn't particularly big, so it's easy to stray. You have to be very careful and know what you're doing. Not surprisingly, many books and articles have been written about TDD, including quite a few on this blog.
The best of both worlds #
In Functional Programming, on the other hand, Isolation is the ideal. An ideal function is already isolated from its dependencies, so no more design work is required to make it testable.
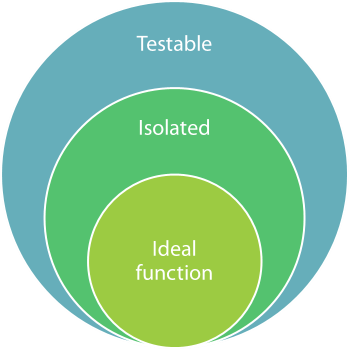
Ideal Functional design is not only ideal, but also perfectly testable, so there's no conflict. This is the underlying reason that TDD doesn't lead to test-induced damage with Functional Programming.
Summary #
Isolation is an important quality of Functional Programming. An ideal function is Isolated, and that means that it's intrinsically testable. You don't have to tweak any design principles in order to make a function testable - in fact, if a function isn't testable, it's a sign that it's poorly designed. Thus, TDD doesn't lead to Test-Induced Damage in Functional Programming.
If you want to learn more about this, as well as see lots of code examples, you can watch my Test-Driven Development with F# Pluralsight course.
Comments
A Pure function is a function that always returns the same value given the same input, and has no side-effects.
What do you mean by "value"? Can an exception instance be a value? More specifically, would you say that the C# function int Foo() => new Exception(); is pure?
Many of your posts mention pure funcitons and at least a few of them include your own definition. I decided to comment on this post since it was the oldest post I found that included your own definition of a pure function.
Tyson, thank you for writing. I don't think that int Foo() => new Exception(); compiles...
Apart from that, how do you find that this is my own definition of a pure function? It seems to me to be a standard and non-controversial definition. I even link to the Wikipedia definition in the beginning of the article.
Apart from that, how do you find that this is my own definition of a pure function? It seems to me to be a standard and non-controversial definition. I even link to the Wikipedia definition in the beginning of the article.
I am not trying claim that any particular definition of a pure function is non-standard or is controversial. I also don't mean that the text I quoted is "your definition" in the sense that it semantically differs from the one on Wikipedia. I just mean that it is "your definition" in the sense that you have syntactically included in your post the text that I quoted.
However, I am unsure about the precise meaning the defintion for a pure function that you have syntactically included in your post and that I quoted. To help me improve my understanding of that defintion, I tried to ask you if a particular C# function is pure.
I don't think that int Foo() => new Exception(); compiles...
Ah, yes. Thanks for alerting me to my mistake. I meant to include the throws keyword as well. For clarity, I now repeat that whole paragraph but with the prose "thrown" and the keyword throws added.
What do you mean by "value"? Can a thrown exception instance be a value? More specifically, would you say that the C# function int Foo() => throws new Exception(); is pure?
Tyson, your code still doesn't compile, but I think I understand the question 😜
Yes, int Foo() => throw new Exception(); is still a pure function, but it isn't total. Rather, it's a partial function. This is an independent quality of functions.
Purity relates to determinism and the lack of side effects. A total function, on the other hand, is a function that returns a proper value for every possible value in its domain. What do I mean by proper?
There's two ways in which a function can fail to return a value. One is if the function never returns. Due to the halting problem there's no general-purpose way to determine whether or not this is the case for a Turing-complete language.
Another way a function can fail to return a value is if it throws an exception. Most languages (even Haskell!) allows exception-throwing. This isn't considered a 'proper' value because, using the type system, you declared that Foo returns an int. It doesn't. It 'returns' an exception.
Both non-termination and exceptions are typically considered a special value termed bottom, often written with the symbol ⊥.
Functions can be pure, but partial. Your Foo function is an example of that. The holy grail in statically typed functional programming is pure and total functions. It's up to the programmer to provide the totality guarantee, though, since the type system can't enforce termination (due to the halting problem). You can, on the other hand, easily program without exceptions once you get the hang of it.
Thanks for seeing pass my second compile error and understanding my question.
Ah, yes. I definitely know about partial and total functions from my experience with mathematics, and I am pretty sure I have previously called a function that throws an exception partial, but I completely forgot about this connection. (I think that is because I have so focused on purity.) Thank you for bringing this concept (back) to my attention.
[The definition of a pure funciton in question] seems to me to be a standard and non-controversial definition.
I was asking about pure functions and exception throwing because I was thinking about the definition for a pure function given by Enrico Buonanno in Functional Programming in C#. He considers throwing an exception a side effect and includes this paragraph about this decision.
Some will argue that a function can be considered pure despite throwing exceptions. However, in throwing exceptions it will cause indeterminism to appear in code that makes some decisions based on exception handling, or in the absence of exception handling, in the side effect of the program crashing.
What do you think about Enrico's choice to define exception throwing as a side effect?
It might be worth considering async void Foo() => throw new Exception(); because it produces an unhandled exception, which crashes the executing process.
I haven't seen anyone take that position before, so I can only evaluate it based on what you wrote. With that limited context, however, I don't find the argument convincing. First, that throwing exceptions will cause indeterminism to appear in code that handles exceptions says nothing about the function that throws the exception. It says something about the code that handles the exception.
Making decisions based on data is itself not non-deterministic. If it was, if/else blocks or pattern matching couldn't be pure. If the exception handler does something impure while handling an exception, then it's just an impure action. The functional interaction law explicitly allows this.
Keep in mind that the definition of purity that we're discussing is really only a checklist to figure out whether a function is referentially transparent. That's the core definition: Can you replace a function call with its result?
Yes, if the function is pure. This includes a function that throws an exception. It basically just returns ⊥. If you have code that handles the exception, it'll do that based on the exception that was thrown. It doesn't really matter if the function 'actually executed' or not. We can replace the function call with the bottom value.
If you don't handle the exception, then yes: the program crashes. It'll do so, however, regardless of whether you 'run' the function, or you just replace it with a thrown exception.
Yes, this helps. I agree with you. Thanks for your explanation.
Due to the halting problem there's no general-purpose way to determine whether or not this is the case for a Turing-complete language.
...
It's up to the programmer to provide the totality guarantee, though, since the type system can't enforce termination (due to the halting problem).
The respective problems of deciding if a given function is total or pure are equally difficult; both are undecidable by Rice's theorem. A compiler for Haskell is not a general-purpose algorithm for deciding the purity of a function. It follows from the syntax of Haskell that all functions in Haskell with a return type different from the IO monad are pure (and technically all the others as well). Rice's theorem doesn't apply when the property being checked is syntactic.
In the same way, it is possible to design a programming language with two contexts: one in which partial functions can be defined and another in which only total functions can be defined. As before, the partial function context could be expressed by the syntactic requirement that the return type is some monad.
I'm not familiar with Rice's theorem, so I'll have to take your word on that. Haskell, however, seems to be doing a fairly good job of distinguishing between pure and impure, but this could be because the impure actions ultimately aren't implemented in Haskell (IIRC, they're written in C or C++). This might be analogous to the following escape hatch for partiality versus totality.
You can't define a Turing-complete language where you generally distinguish between total and partial functions. That's what Turing, Gödel, and Church proved in the 1930's. The escape hatch is that if you define a language that's not Turing-complete, you can distinguish between total and partial functions. If I remember correctly, that's the underlying design philosophy of Idris. I believe that Edwin Brady once called the concept Pac-Man-complete; while not Turing-complete, he was aiming for a language powerful enough that you could still implement Pac Man in it. I do believe that Idris also comes with an option where you can escape into the wider, Turing-complete part of the language by giving up on the compiler checking of totality versus partiality.
Ah, great. Your comment motivated me to read more about Idris, and I have learned some things.
First, Idris includes a totality checker for functions. By default, a function is not checked for totality. Putting the keyword total above a function defintion enables the checker. Here are some examples of this. The code then compiles if and only if the checker (which is essentially a theorem prover) is able to prove that the function is total. So the two contexts are distinguished by the presence or absence of the keyword total. This is a completely different approach to creating the two contexts than what I was vaguely suggesting.
Second, Idris is Turing-complete as confirmed by Edwin Brady himself. Furthermore, both Edwin and this page about coinductive that he cites say (paraphrased into my words) that one could also separate the partial and total contexts using a monad. Though the linked page goes onto say that "this is a heavyweight solution, and so we would like to avoid it whenever possible."
I am really glad to have learned those things. Thanks for the great conversation :)
Would you say that int Foo() { if (new Random().Next() % 2 == 0) throw new Exception(); else throw new NotImplementedException(); } is pure?
No, that variation of Foo is impure because of the non-deterministic behaviour. You can't replace a call to Foo with a corresponding bottom value.
Idris is very interesting. Have you seen attempts to test totality in other languages?
Spencer, thank you for writing. Usually, the names Agda and Coq are thrown around when Idris is mentioned. As far as I understand things, however, both Agda and Coq are mostly intended to be additional tools that you use together with another language, whereas the vision for Idris is to be a complete programming language. I could be wrong, though. It's a rabbit hole that I've yet to explore.
Another language worth mentioning might be F*, but again, I know little about it, and have never written a line of code in it.
Thank you for the leads! These languages are very interesting. I'd never heard of "proof-oriented programming" or depdendant types before. It's going to a take a while to unpack these new approaches.
I notice all these languages take a proof-based approach to verifying totality. I'm curious about your take on a possible experimental approach.
I've been trying to meld ideas from Clojure.spec into a type-driven approach in F#, in line with Scott Wlaschin's Designing with Types and your Types + Properties = Software. Clojure Spec, in case you're unfamiliar, is the Specification pattern as an optional type system. Types are built up through combinations of constraints (e.g. InventoryCount must be an int of at least 0 and no more than 10000). Spec can then automatically test type-annotated functions to verify that any input that fits constraints produces output that fits constraints. It's basically property testing with generators automatically created from the in-code type specifications.
I think this kind of testing is effectively a measure of totality; a measure of how well a function's actual domain matches its advertized domain. Clojure does not make that claim, and I haven't found a similar approach from another language or framework yet.
While less thorough than proofs, such a technique could be applied to most any system with static typing through meta-programming and conventions to find type constraints (i.e. via factory functions). The proportion of inputs that error or timeout could be a consistent measure for migrating systems to more total, and less surprising, functions.
Thoughts?
Spencer, thank you for writing. While I know that Clojure.spec exists, I don't know more about it than what you've described. It's not quite the same, but it sounds not too dissimilar from QuickCheck Arbitrary instances. They don't describe predicates, but they do implement (pseudo-random) generators of values. Those generators then drive data generation for property-based tests.
Parametrised tests (including properties) are essentially predicates. They take input and return a binary result. Granted, the result isn't true or false, but rather pass or fail, but I hope it's evident that these are isomorphic.
How does that relate to testing totality? It's better than nothing, but in practice we must suffer the reality of combinatorics. You can easily use brute force to prove total a function that takes a single Boolean value as input. A byte input requires 256 test cases, so that's also within the realm of the possible. Many input types, however, represent conceptually infinite sets. A string, for example, represents a conceptually infinite set.
Imagine an adversarial function that loops forever if the input string is a very particular value. This value might be a one-million-character string generated randomly at compile time. The odds that any random test case generator ever hits that particular value are effectively nil.
While I like property-based testing a lot, I don't consider it a measure of totality. If the domain of a function is infinite, it makes little difference if you exercise a hundred or a million test cases - you've still covered practically zero percent of the domain.
You make an excellent point. If I understand correctly, many domains are effectively infinite so coverage of random testing is effectively negligable.
My connection to totality came from trying to understand what Clojure spec's instrument function is really testing. It's a property, but the property only knows the shape of the domain and range. It knows nothing about relationships between specific input and output values. Therefore, it doesn't verify business domain correctness. Rather, it's checking that the range holds true for a sampling of valid input values.
In light of your insight, it may be more fair to say this is a coverage "surprise" check. It can run common edge cases and input scenarios to make sure they return values from the advertized range rather than exceptions (or fail to terminate). As you discerned, it cannot generally detect adversarial implementations that would violate totality.
Thank you for taking the time to consider this idea and share your expertise!
Spencer, thank you for writing. If I understand your description of Clojure.spec correctly, this makes sense in a dynamically typed language like Clojure. It's seems reminiscent of fuzz testing in the sense that you throw arbitrary input at a System Under Test and then monitor what happens. This makes sense in a system where input is mostly (or exclusively) checked at run time.
In a language like Haskell, on the other hand, that kind of testing is generally impossible. You can't just throw random, unconstrained input at a Haskell function, because if the input doesn't type-check, the code will not even compile. Languages like C# and Java seem to fall more on that side than on the Clojure side, even though their types systems involve more ceremony.
To be clear: You could imagine something akin to a 'totality check' even in Haskell. After all, we know from the papers of Church, Gödel, and Turing that no type system can prove arbitrary Turing-complete code total (i.e. the halting problem). Even with the best-designed Haskell API, one might conceivably want to write a QuickCheck property that throws random (typed) input at a function only to assert that it returns a value. In essence, this would be an assertion-free test. The implicit assertion is that if the function returns without exceptions or timing out, then it may be total.
While one could do that, once you've gone through the trouble of writing such a property, you can often think of some sort of explicit assertion to write. If so, why not do that? But if you do, you've now ventured into the territory of genuine property-based testing. There's nothing wrong with that - quite the contrary - but I think it explains why you tend to not see the above kind of totality checking in statically typed languages.
Another point to consider is this: With a decent static type system (and I count C# in that category), you can often design APIs so that the types take care of most concerns regarding totality. It helps to realise that in most languages, functions can be partial in two ways:
- A function may throw an exception
- A function may never terminate
You can usually eliminate the first kind of partiality by carefully choosing input and output types. Thus, in a statically typed language, you're often left with the question: Will this function always terminate?
While the halting problem says that there's no general algorithm that will answer that question, it's often obvious for specific functions. For instance, if a function has no recursion or looping, it obviously will terminate. This, to be clear, involves 'white-box' analysis. You have to look at the code and convince yourself that the function will terminate.
I've possibly strayed off your original agenda, but I found your comments and responses inspiring. I hope you or someone else find these notes useful.
I'm glad you've found this line of thought interesting! I've definitely enjoyed and benefitted from our discourse.
I agree this kind of testing bears a strong resemblance to fuzzing and that static types eliminate the majority of invalid inputs up front.
I'm going to dig deeper into my journey to see if it can explain why I think these tests are valuable.
It may not be clear, but the best thing about Clojure Spec's fuzz-like tests is that they don't have to be written at all. All type information is present in the type annotation, including primitive constraints like bounded integers. An introspective function can generically infer generators and assertions from type annotations to create the tests. All annotated functions get these fuzz tests for free.
In static languages, we get the structural component of these tests for free from the compiler. However, we're still missing out on verifying constrained values.
Approaches to combat primitive obsession go a long way toward eliminating such errors and defensive programming from our domains by centralizing validation and coupling it to a type.
Scott Wlaschin demonstrates constrained types using unions
type String50 = private String50 of string
module String50 =
let create str =
if String.IsNullOrEmpty(str) then
None
elif String.length str > 50 then
None
else
Some (String50 str)
More traditionally, it'd be a constructor
class String50
{
private string value;
public String50(string str)
{
if (String.IsNullOrEmpty(str))
{
throw new ArgumentNullException("str");
}
else if (str.Length > 50)
{
throw new ArgumentException("String50 cannot be longer than 50 characters");
}
else
{
this.value = str;
}
}
}
These approaches implement constrained types as a pattern rather than a language construct. A programmer could undermine them by forgetting to keep constructors private, adding new constructors, assigning via reflection, etc.
I spent a while trying to figure out how to add constrained values to F#'s types system and understand what it could do for us. It ultimately failed, but you can check out my attempts and my reasoning in the github repo. This was prior to me learning about dependent type systems, which are the more mature realization of my line of thought.
I later realized that the constraints don't need to be part of the type to be useful. The constraints are represented in the code as factories or constructors. The code itself will enforce the expectations at runtime. At test time it's ok to rely on slow introspective approaches to identify constraints. In that way, we too have all the information we need to mechanically property test a system just like clojure spec does. In fact, we can test every function in the system, intentionally constrained or not, because static languages require typing.
What do these tests do? Like with spec, we can derive some confidence that our system handles the values it says it does. Though not total certainty, which requires a white-box approach as you mentioned.
If a system is migrating from heavy use of exceptions for defensive programming, or from general lack of defensive programming, then this kind of test can track progress away from exceptions.
It can also help consistency of our constrained types. For example, we can always select the most weakly constrained factory or constructor. This prevents accidental public constructors (which, admittedly, could also be accomplished with an annotation and a simple analyzer). We can also pressure towards conventions like naming the factory a certain way, or only using results over exceptions for communicating errors from factories.
As a side benefit, we can also leverage the introspected generators to write our own properties. This reduces duplicated knowledge of constraints between the system and tests, keeping them in line automatically.
Thanks for reading this far. This is all pretty conceptual at this point. I hope it's fun food for thought.
A bit more rumination and I realized my thoughts above can be summarized in a few key points
- Clojure Spec tests I refer to aren't written, they're programmatically inferred from code
- Static languages encode all the information needed to programmatically generate and assert constrained value types like Clojure Spec, it's just that part of information lives in functions rather than types.
- Constrained values are effectively a design pattern in most static languages. The language can't guarantee a consistent approach or consistent application, so there's value in adding natural pressures to be consistent. It's kind of like how you once explained the value of DI containers
- These tests can smoke out defensive programming issues and misadvertized function signatures. This is only generalizable if we can differentiate expectable failures from unintended issues, thus why these tests mostly measure movement away from exceptions.
Spencer, thank you for writing. I already got the sense that the Clojure.spec tests weren't written, but thank you for confirming that. I don't know the implementation details of how that works, but I may have an inkling.
Clojure is, as I'm sure that you're aware, homoiconic. Thus, I suppose that the specs are written in Clojure as well. A function or macro can extract the details of each spec and generate test data that are likely to fit.
Consider, as a though experiement, a type like this:
public sealed class Narrows { private readonly long value; private Narrows(long value) { this.value = value; } public static Maybe<Narrows> TryCreate(long candidate) { if (candidate < 2_993_329_992 || 3_001_322_003 < candidate) return new Maybe<Narrows>(); return new Maybe<Narrows>(new Narrows(candidate)); } }
If this was, instead, Clojure, then from perusing the Clojure.spec documentation it looks as though you'd use a predefined specification called int-in, but even if you'd be using normal less-than and greater-than operators, I suppose it wouldn't be beyond the abilities of a sophisticated function to tease apart such a predicate and compose a useful generator.
In languages like C#, F#, Java, or Haskell, however, predicates and types are typically black boxes. For the Narrows class, you have a static factory method. This factory method is total, but if you throw random 64-bit integers at it, the chance of ever getting a populated Maybe value is vanishingly small.
If you now have a function that takes that type as input, you can't really exercise it because of the statistics involved. This is why most property-based testing frameworks that I've seen (QuickCheck, Hedgehog, FsCheck, CsCheck) are based on a generator API (usually called either Arbitrary or Gen).
While you can compose a type-specific generator from other generators, you have to explicitly do that work. The testing framework can't infer the set of valid values to use.
I'm not disagreeing with what you wrote. I'm only trying to outline how I see such efforts interact with the capabilities of various languages.
If I interpret this correctly, you're saying languages like C# and similar would have to throw random values at the Narrows TryCreate function to find instances. However, Clojure could use its macro system to understand the functions symbolically and semantically.
I think that languages like C# and F# can also semantically analyze code, but it has to be done through the compiler platforms (i.e. Roslyn, FSharp Compiler Services) or similar meta-programming. These are performance heavy, not every language has one, and only work when we have access to code, but they do make semantic analysis possible for functions.
We could use the compiler platform to parse constraints from factories. For example, analyze Narrows.TryCreate to find comparison operators, and that those comparisons lead to a "None" value. The other conditional branch is "Some", thus Narrows requres a long greater than 2_993_329_992 and less than 3_001_322_003. Then we use the inferred constraints to create typical property test generators and arbitraries.
However, I think your musing from a few posts back are now clicking better. You mused that static languages can effectively eliminate exception-based partiality through careful choice of types. I see two main categories of exceptions
- Exceptions intentionally used to assert function pre- and post-conditions -> Shouldn't be needed when using constrained types like Narrows alongside results and options. Limiting unsanctioned use of exceptions for assertions may be easier to solve with a simple static analyzer.
- Exceptions from mishandled data -> These should be caught by the properties we should already be writing. As you pointed out, the spec-like assumptions are essentially a weaker form of normal property tests. And, unlike dynamic structural languages, we have the compiler to verify functions compose together correctly.
This is really interesting. Thank you for pushing my thinking.
Spencer, thank you for writing. I didn't meant to imply that we should make a general-purpose code analyser - this seems to me to move perilously close to the halting problem; that is, I don't think you this is generally possible. (I could be wrong, though, I haven't thought deeply about this.)
What I meant was more that since Clojure.spec is written in Clojure, and Clojure code is also data, it's fairly easy to search a spec for easy-to-detect predicates. Something like a specification is fair game for analysis exactly because of the role it plays. I wouldn't contemplate analysing the function body of a Clojure function like that.
In .NET a typical approach to these kinds of problems is to use attributes. There's been quite a few attempts at that over the years - I've previously engaged with that kind of design, but in summary, I'm not a fan. It does, however, provide some metadata that's fair game for analysis.
The distinction, then, seems more related to the nature of the languages. With a language like C#, if you need metadata, it seems as though you need to invent a language feature for that purpose: attributes. In Clojure, on the other hand, because it's homoiconic, you don't need a separate language feature for metadata. You just write the metadata in Clojure. This doesn't, however, change the role of the spec. Even though you're writing it in Clojure, it plays the role of metadata. One of the implications of that is that it's fair game for an analyser, whereas I think a Clojure function body is still off limits for the Spec engine.
Ah, I misunderstood. I hadn't thought about the relationship between metadata and analyzers. Clojure certainly has the edge for elegant and powerful metadata.
I suppose I feel hope for analyzing function bodies for constraints in this context because type factories tend to contain predicates similar to what we'd use in a spec. Unlike Clojure, this relies on some unenforced expectations on the code and wouldn't always come up with an answer.
Even with that hope, the value proposition seems shaky considering our previous comments.
Ruminating on our discussion, I decided it was worth creating an experimental constraints-as-data library, FsSpec, that leans into the advantages of a static type system.
It doesn't attempt to prove totality or be part of the type system, like is possible in Idris or F*. It normalizes the common activity of constraining primitive values and exposes those constraints as data that can be programmatically accessed.
It'll take use and feedback to determine if this approach really saves complexity, but it was very fun to write. The most fun part was realizing how boolean trees can be normalized to reliably interpret them for data generation.
I'd love to hear your thoughts if it interests you.
Spencer, thank you for writing. FsSpec looks interesting. It strikes me as one of those things where I'd need to try it out on a real code base before I could pass an informed verdict.
Very early in the discussion, Tyson Williams asked about Exceptions and purity. In one answer you talked about exceptions being a kind of bottom value. Does that mean that there are multiple values of type Bottom that can potentially be equatable? That doesn't feel right to me...
Daniel, thank you for writing. At this point, I'm basing my incomplete knowledge on all sorts of different sources, not all of which I can readily remember or identify. The Haskell wiki article on bottom, however, also discusses two kinds of bottom. That may have been where I've picked it up.
In general, bottom values originating from invalid input are avoidable in statically typed languages. Instead of throwing exceptions, it's possible to return a Maybe or Either value. In practice, we don't always do that. Division (which is not defined by zero) may be the most infamous example.
Infinite loops, on the other hand, can't be type-checked away, as already discussed here.
Test-Driven Development with F# Pluralsight course
Test-Driven Development and Functional Programming is a match made in heaven. Learn how and why in my new Pluralsight course.
A common criticism against Test-Driven Development (TDD) is that it leads to Test-Induced Damage. However, it doesn't have to be that way, and it turns out that with Functional Programming (FP), the design ideals of FP coincide with TDD.
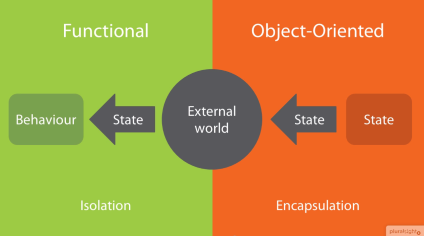
In my new Pluralsight course on Test-Driven Development with F#, you'll learn how the intersection between TDD and F# presents opportunities for better design and better testability.
Introduction to Property based Testing with F# Pluralsight course
My latest Pluralsight course is an introduction to Property-Based Testing with F#.
Soon after the release of my Unit Testing with F# Pluralsight course, it gives me great pleasure to announce my new course, which is an Introduction to Property-based Testing with F#.
In this course, you'll get an introduction to the concept of Property-Based Testing, and see a comprehensive example that demonstrates how to incrementally implement a feature that otherwise would have been hard to address in an iterative fashion.

Comments
I would have done this...
Craig, fair enough :)
In addition to Craig's proposal (which I immediately though of too hehe), think of this one:
        const string MATCH_UPPERCASE_LETTERS = "(?<=.)[A-Z]";
        // ...
        Regex.Replace(s, MATCH_UPPERCASE_LETTERS, letterFound => "-" + letterFound.Value).ToLower();
It probably does not follow the whole conventions of the language, but the great thing about it is that it can be easily understood without knowledge of the language. This brings it to another complete level of maintainability.
Of course, the meta-information that you convey through the code is subject to another complete analysis and discussion, since there are way too many options on how to approach that, and while most of us will lean on "readable code", it all comes down to what the code itself is telling you about itself.
Finally, as a side note, something that I found quite interesting is that most of the introductory guides to Ruby as a language will talk about how Ruby was design to read like english.
door.close unless door.is_closed?(based on Why's Poignant Guide to Ruby.)
While I found that pretty appealing when learning Ruby, some other constructs will take it far away from how English works, pretty much what happened to your example with F#. Not that they cannot be made to read easier, but that extra effort is not always performed.
My conclusion is: readability is not about the code or the algorithm (which definitely can help), but about the information that the code itself gives you about what it does. Prefer to use pre-built language functions rather than implementing them yourself.
In under than 30 seconds of seeing the code blocks, I can't follow any of the process. But I know what the operation is doing thanks to the operation name, nerdCapsToKebabCase. Surely that the terms nerdCaps and KebabCase is uncommon, but I only need some minutes to know what are those using internet.
So for me, no matter how good you write your code, you can't make it commonly readable by using the code itself. Won't the readability can be enhanced by using comments / documentation? Ex: /* convert thisKindOfPhrase to this-kind-of-phrase */. I've also used unit tests to improve the readability to some extent too.
To end the loop it may be fair to give a JavaScript function sample which became more idiomatic since 2015 :)
ES5 syntax to be consistent with the first example.
          var nerdCapsToKebabCase = function (text) {
            return text.split('')
                       .map( function(c){
                          return (c === c.toUpperCase()) ? '-' + c.toLowerCase() : c ;
                       })
                       .join('');
          };
I know you can use String.prototype.replace with a regex in this case but it don't illustrate well the idiom from Imperative to functional (even it's a High-Order Function).