ploeh blog danish software design
How to change the Generate Property Stub refactoring code snippet in Visual Studio 2012
This post describes how to change the code template for the 'Generate Property Stub' refactoring in Visual Studio 2012.
This is mostly a quick note for my own benefit (since I just spent half an hour chasing this down), but I'm posting it here on the blog, in case someone else might find it useful. Here's how to change the code snippet for the "Generate Property Stub" smart tag in Visual Studio 2012:
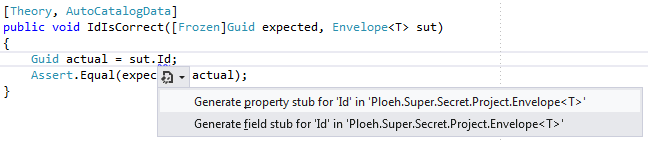
The template for this code is defined in
C:\Program Files (x86)\Microsoft Visual Studio 11.0\VC#\Snippets\1033
\Refactoring\GenerateProperty - Auto Property.snippet
You can open this file and hand-edit it, but contrary to previous versions of Visual Studio, it seems that you have to restart Visual Studio before the change takes effect.
If you do this, be sure that you know what you're doing; you'd be mucking around with the internals of your Visual Studio installation.
Advanced Unit Testing Pluralsight course
Service announcement: my new Pluralsight course Advanced Unit Testing is now available. Read more in Pluralsight's announcement, or go straight to the course.
If you don't already have a Pluralsight account, you can get a free trial of up to 200 minutes.
FizzBuzz kata in Clojure
This post describes my first experience with doing the FizzBuzz kata in Clojure.
After having looked at Clojure for some time, I finally had a bit of time to play with it, so I decided to do the FizzBuzz kata in Clojure.
Single fizzbuzz function #
Clojure has a built-in testing framework, so I wrote a Parameterized Test for a single fizzbuzz function. Using TDD, I added test cases a little at a time, attempting to follow the Transformation Priority Premise, but the end result is this:
(ns fizzbuzz.core-test
  (:use clojure.test
        fizzbuzz.core))

(deftest fizzbuzz-test
  (are [expected i] (= expected (fizzbuzz i))
       "1" 1
       "2" 2
       "Fizz" 3
       "4" 4
       "Buzz" 5
       "Fizz" 6
       "7" 7
       "8" 8
       "Fizz" 9
       "Buzz" 10
       "11" 11
       "Fizz" 12
       "13" 13
       "14" 14
       "FizzBuzz" 15
       "FizzBuzz" 30))
Clojure syntax is somewhat backwards from what I'm normally used to, but the are macro expands into a collection of tests that each evaluate whether the result of invoking the fizzbuzz function with i is equal to expected.
Through a series of transformations of the SUT, I ended up with this implementation of the fizzbuzz function:
(ns fizzbuzz.core)

(defn fizzbuzz [i]
  (cond
    (= 0 (mod i 15)) "FizzBuzz"
    (= 0 (mod i 3)) "Fizz"
    (= 0 (mod i 5)) "Buzz"
    :else (str i)))
This defines a function called fizzbuzz taking a single argument i. The cond macro evaluates each test and returns the expression associated with the first test that evauluates to true. The first test checks if i is divisible with 15 and returns "FizzBuzz" if this is the case; the next test checks if i is divisible with 3 and returns "Fizz" if this is true, and so on.
Printing a range of fizzbuzz values #
The task defined by the kata is to print all FizzBuzz values from 1 to 100, so the above function is't the final solution. The next step I took was to write a test that defines a version of the fizzbuzz function taking two parameters:
(def acceptance-expected
"1
2
Fizz
4
Buzz
Fizz
7
8
Fizz
Buzz
11
Fizz
13
14
FizzBuzz
16
17
Fizz
19
Buzz
Fizz
22
23
Fizz
Buzz
26
Fizz
28
29
FizzBuzz
31
32
Fizz
34
Buzz
Fizz
37
38
Fizz
Buzz
41
Fizz
43
44
FizzBuzz
46
47
Fizz
49
Buzz
Fizz
52
53
Fizz
Buzz
56
Fizz
58
59
FizzBuzz
61
62
Fizz
64
Buzz
Fizz
67
68
Fizz
Buzz
71
Fizz
73
74
FizzBuzz
76
77
Fizz
79
Buzz
Fizz
82
83
Fizz
Buzz
86
Fizz
88
89
FizzBuzz
91
92
Fizz
94
Buzz
Fizz
97
98
Fizz
Buzz")

(deftest acceptance-test
  (is (= acceptance-expected (fizzbuzz 1 101))))
I decided to define the acceptance-expected value outside of the test case itself, as I thought that made the test a bit more readable. The test case is defined by the is macro and states that the expected value is acceptance-expected and the actual value is the result of invoking the fizzbuzz function with two arguments: 1 as the (inclusive) start value, and 101 as the (exclusive) end value. The above code listing of fizzbuzz only accept one argument, but the new test case requires two arguments, so I added an overload to the function:
(defn fizzbuzz
  ([i]
    (cond
      (= 0 (mod i 15)) "FizzBuzz"
      (= 0 (mod i 3)) "Fizz"
      (= 0 (mod i 5)) "Buzz"
      :else (str i)))
  ([start end]
    (apply str
      (interpose "\n"
        (map fizzbuzz (range start end))))))
The previous implementation is still there, now contained within the overload taking a single argument i, but now there's also a new overload taking two arguments: start and end.
This overload generates a sequence of integers from start to end using the range function. It then maps that sequence of integers into a sequence of strings by mapping each integer to a string with the fizzbuzz function. That gives you a sequence of strings such as ("1" "2" "Fizz" "4" "Buzz").
In order to print all the FizzBuzz strings, I need to interpose a newline character between each string, which produces a new sequence of strings such as ("1" "\n" "2" "\n" "Fizz" "\n" "4" "\n" "Buzz"). To concatenate all these strings, I apply the str function to the sequence.
Printing FizzBuzz values from 1 to 100 #
The requirements of the kata is to print all FizzBuzz values from 1 to 100, and the code already does this. However, I interpret the kata as requiring a single function that takes no parameters, so I added an acceptance test case:
(deftest acceptance-test
  (is (= acceptance-expected (fizzbuzz 1 101)))
  (is (= acceptance-expected (fizzbuzz))))
Notice the second test case in the last line of code that invokes the fizzbuzz function without any parameters. It's easily resolved by adding a third overload:
(defn fizzbuzz
  ([]
    (fizzbuzz 1 101))
  ([i]
    (cond
      (= 0 (mod i 15)) "FizzBuzz"
      (= 0 (mod i 3)) "Fizz"
      (= 0 (mod i 5)) "Buzz"
      :else (str i)))
  ([start end]
    (apply str
      (interpose "\n"
        (map fizzbuzz (range start end))))))
As you can see, the first overload takes no parameters and simply invokes the previously desribed overload with the start and end arguments.
FWIW, this entire solution is structurally similar to my implementation of FizzBuzz in F#.
Ploeh blog syndication feed addresses
Service announcement about syndication feed addresses for ploeh blog.
Now that Google Reader is closing down and a lot of my readers may want to migrate their ploeh blog subscription to another service, I think it's the right time for a quick post about ploeh blog's syndication feed addresses.
When I migrated my blog to Jekyll I made it a priority to ensure a certain level of backwards compatibility. The permalinks for the old posts are still served, although they are now redirects. For that reason, I also left the old syndication feed addresses in place. Specifically, I left this old RSS feed address in place: /SyndicationService.asmx/GetRss. This feed address sort of works, but has issues.
There are several problems with the 'legacy' feed address:
- Due to the way Jekyll works, the address actually points to an index.html file. Since a Jekyll-powered site is a static site, I don't control the server, and thus I can't manipulate the HTTP headers for individual resources. HTML files are served with the "text/html" Content-Type, which doesn't fit the XML content. Some clients seem to dislike this.
- Google Reader has created some 'ghost' entries based on the feed. I wonder if it has anything to do with the faulty Content-Type.
- Other users have reported that their clients (e.g. Outlook) don't like the feed. Again, I suspect it's because of the faulty Content-Type. While I think those clients should follow Postel's law, they apparently don't.
- The address looks very implementation-specific.
However, ploeh blog has new, 'proper' syndication feed addresses, so if you're already in the process of migrating your subscriptions away from Google Reader, please take a moment to update your subscription. That 'legacy' RSS address may not stick around forever.
The proper syndication feed addresses for ploeh blog are:
Both serve responses with the "text/xml" Content-Type.How to automatically populate properties with AutoMoq
This post explains how to automatically populate properties when using AutoFixture.AutoMoq.
In a previous blog post I described how to configure AutoFixture.AutoMoq to set up all mock instances to have 'normal' property behavior. This enables you to assign and retrieve values from properties defined by interfaces, but still doesn't fill those properties with values.
Apparently, people want to do that, so here's how to do it with the AutoMoq glue library.
This solution builds upon the PropertiesPostprocessor described in my previous blog post. All you have to do is define a different Customization for AutoFixture so that, instead of using the AutoMoqPropertiesCustomization described in the previous post, you'll need a variation:
public class AutoPopulatedMoqPropertiesCustomization : ICustomization
{
    public void Customize(IFixture fixture)
    {
        fixture.Customizations.Add(
            new PropertiesPostprocessor(
                new MockPostprocessor(
                    new MethodInvoker(
                        new MockConstructorQuery()))));
        fixture.ResidueCollectors.Add(
            new Postprocessor(
                new MockRelay(),
                new AutoPropertiesCommand(
                    new PropertiesOnlySpecification())));
    }

    private class PropertiesOnlySpecification : IRequestSpecification
    {
        public bool IsSatisfiedBy(object request)
        {
            return request is PropertyInfo;
        }
    }
}
The PropertiesPostprocessor assigned to the Fixture's Customizations has the same configuration as shown in AutoMoqPropertiesCustomization, but the object graph passed to the Fixture's ResidueCollectors is different. It's still a MockRelay, but now decorated with a Postprocessor instance, configured with an AutoPropertiesCommand instance, which is the class in AutoFixture responsible for implementing the AutoProperties feature.
The only thing special about this configuration is that you need to pass a PropertiesOnlySpecification to the AutoPropertiesCommand instance. This is because, by default, AutoPropertiesCommand attempts to fill both properties and fields of a generated instance (we call that a specimen), but it turns out that when you ask Moq to generate an instance of an interface, the generated type has a lot of public fields that you don't want to mess with. The PropertiesOnlySpecification class filters the population algorithm so that it only attempts to populate public properties.
This test passes:
[Fact]
public void AutoPopulatedProperties()
{
    var fixture = new Fixture().Customize(
        new AutoPopulatedMoqPropertiesCustomization());
    var h = fixture.Create<IHasProperties>();

    Assert.NotEqual(default(string), h.Text);
    Assert.NotEqual(default(int), h.Number);
}
With the described AutoPopulatedMoqPropertiesCustomization, AutoFixture will populate all writable properties on interfaces generated by Moq. I still don't think this is a good idea, which is why it isn't the default behavior for AutoFixture, but as you can tell, it's not too hard to do.
How to configure AutoMoq to set up all properties
This post explains how to configure AutoFixture.AutoMoq to setup all interface properties to behave like normal properties.
From time to time, people want the AutoFixture.AutoMoq Auto-Mocking Container to set up all mock instances to have 'normal' property behavior.
By default, Moq doesn't implement any members of an interface. You have to explicitly configure the desired behavior using the Setup methods. This is also true for properties (which are really only special methods).
Consider, as an example, this interface:
public interface IHasProperties
{
    string Text { get; set; }

    int Number { get; set; }
}
Personally, I think such an interface design is a design smell, but that's not the issue here.
Moq behavior #
The issue is that by default, Moq behaves like this:
[Fact]
public void DefaultMoqDoesNotSetupProperties()
{
    var h = new Mock<IHasProperties>().Object;

    h.Text = "foo";
    h.Number = 42;

    Assert.Equal(default(string), h.Text);
    Assert.Equal(default(int), h.Number);
}
As you can infer from this test, the IHasProperties instance completely ignores any attempt at assigning values to the properties. When you attempt to read the property values, Moq returns the default value for the property type - often null.
You can configure each property individually, but you can also configure the Mock instance to implement all properties as thought they are normal, well-behaved properties:
[Fact]
public void ManualSetupProperties()
{
    var td = new Mock<IHasProperties>();
    td.SetupAllProperties();
    var h = td.Object;

    h.Text = "foo";
    h.Number = 42;

    Assert.Equal("foo", h.Text);
    Assert.Equal(42, h.Number);
}
Notice the use of the SetupAllProperties method. So far, this is all about Moq, and really has nothing to do with AutoFixture.
AutoFixture.AutoMoq and interface property behavior #
Adhering to the Principle of least surprise, the AutoFixture.AutoMoq glue library doesn't change this behavior:
[Fact]
public void DefaultAutoMoqDoesNotSetupProperties()
{
    var fixture = new Fixture().Customize(new AutoMoqCustomization());
    var h = fixture.Create<IHasProperties>();

    h.Text = "foo";
    h.Number = 42;

    Assert.Equal(default(string), h.Text);
    Assert.Equal(default(int), h.Number);
}
However, it's easy to change the behavior in an ad hoc manner:
[Fact]
public void ManualSetupPropertiesOnAutoMoq()
{
    var fixture = new Fixture().Customize(new AutoMoqCustomization());
    var h = fixture.Create<IHasProperties>();
    Mock.Get(h).SetupAllProperties();

    h.Text = "foo";
    h.Number = 42;

    Assert.Equal("foo", h.Text);
    Assert.Equal(42, h.Number);
}
As you can see, you can use the static Mock.Get method to get the underlying Mock<IHasProperties> and explicitly invoke the SetupAllProperties method.
If you prefer AutoFixture to automate this for you, it's fairly easy to do. First, you'll need to write an ISpecimenBuilder that hooks into the Mock creation process and invokes the SetupAllProperties method:
public class PropertiesPostprocessor : ISpecimenBuilder
{
    private readonly ISpecimenBuilder builder;

    public PropertiesPostprocessor(ISpecimenBuilder builder)
    {
        this.builder = builder;
    }

    public object Create(object request, ISpecimenContext context)
    {
        dynamic s = this.builder.Create(request, context);
        if (s is NoSpecimen)
            return s;

        s.SetupAllProperties();
        return s;
    }
}
This class must decorate another ISpecimenBuilder, whose responsibility it is to create Mock<T> instances. The example code shown here is only a proof of concept, so it only does the bare minimum of defensive coding, assuming that if the object returned from the decorated ISpecimenBuilder is not a NoSpecimen, then it must be a Mock instance. In that case, it invokes SetupAllProperties on it.
You'll need to compose this PropertiesPostprocessor class together with all the other building blocks of the AutoMoq glue library. Currently, there's no specific hook into AutoMoqCustomization that enables you to do that, but if you decompose AutoMoqCustomization, you'll realize how easy it is to replicate the behavior while adding your new PropertiesPostprocessor class:
public class AutoMoqPropertiesCustomization : ICustomization
{
    public void Customize(IFixture fixture)
    {
        fixture.Customizations.Add(
            new PropertiesPostprocessor(
                new MockPostprocessor(
                    new MethodInvoker(
                        new MockConstructorQuery()))));
        fixture.ResidueCollectors.Add(new MockRelay());
    }
}
The only difference from the AutoMoqCustomization implementation is the addition of PropertiesPostprocessor decorating MockPostprocessor.
This test now passes:
[Fact]
public void AutoSetupProperties()
{
    var fixture = new Fixture().Customize(
        new AutoMoqPropertiesCustomization());
    var h = fixture.Create<IHasProperties>();

    h.Text = "foo";
    h.Number = 42;

    Assert.Equal("foo", h.Text);
    Assert.Equal(42, h.Number);
}
As you can see, the Mock object created by AutoFixture now implements properties as normal, well-behaved properties.
Structural Inspection
One way to unit test a complex system is to test the behavior of each part and then verify that the structure of the composition is correct.
How do you unit test complex systems? How do you apply TDD to a complex system? This seems to be one of the most difficult questions related to unit testing.
First, a little language lesson. Complex means that something is, by its very nature, composed of parts.
"Complexity is intrinsic. Something is complex if it involves a lot of [metaphorical] moving parts even when considered as a Platonic ideal."You could say that complexity is the opposite of unity. It's not the same as complicated.
"Complication is extrinsic. Something is complicated by external influences, or because of external influences."So how do you unit test complex systems?
Traditional introductions to TDD tend to focus on simple systems, such as
- Stack
- Fibonacci
- Prime factors
- Bowling game
- Word wrap
A partial answer is provided by one of my favorite quotes from Design Patterns:
Favor object composition over class inheritance.If you can unit test the behavior each sub-component in isolation, then 'all' you need to do is to prove that those parts interact correctly. You can do this by a technique I call Structural Inspection. The idea is to inspect the structure of composed parts - a Facade, if you will. If you know that two composed parts interact in a certain way, and you can also prove that the composed parts have the desired identity, you can prove that a complex system works correctly.
Before I go on, I think it's important to point out that Structural Inspection is one among several approaches you can take to unit testing and TDD. Personally, I've had quite a few successes with this technique, but it tends to require a rather meticulous modus operandi, so it's not suitable in all cases. It works best against complex systems where you can't afford mistakes. The disadvantage is that you'll have to write a lot of tests and at times you may feel that you are moving very slowly, but the advantage is that the final system is not only likely to be correct, but it's proven to be correct.
A note about the following example: it describes a way to unit test a shopping basket, including discounts, VAT, totals, etc. You may think that there are easier ways, and that the technique I describe is overkill. However, I've attempted to strike a balance between something that is sufficiently complex to make the examples realistic, yet still not so complex that it can fit in a single (although long) article.
API design #
Structural Inspection is not only a unit testing technique; it's also an API design philosophy:
What you compose, you can also expose.This means that if you compose objects by applying the Dependency Inversion Principle, you can expose, as a property or field, what you just injected.
public class Discount : IBasketElement
{
    public Discount(decimal amount)

    public decimal Amount { get; }

    public IBasketVisitor Accept(IBasketVisitor visitor)
}
In the above example, the Discount class contains an amount (a decimal value), and implements the IBasketElement interface. The Accept method is the only member defined by that interface. The design philosophy of Structural Inspection is very simple: because it accepts an amount in its constructor, it should also expose that value as a public Amount property (or field).
People unused to TDD often react in one of two ways:
- "I don't like adding members only for testing"
- "It breaks encapsulation"
Well, if you follow TDD, all production code you write, you write as a response to a test you just wrote. The unit tests are the first client of the production API. The important part is whether or not adding a member breaks encapsulation. Adding a property that exposes something that was passed into the constructor by a client, can hardly be said to break encapsulation. Exposing properties doesn't necessarily break encapsulation. Even if you believe that encapsulation is 'information hiding', it makes no sense to hide data that was passed into the object instance by a third party. The object simply isn't the exclusive owner of that data.
However, since the object (like the Discount class in the above example) already holds an instance of the data as a field, it might as well be courteous and share that information with its client. Otherwise, that would just put the onus on the client to remember the value it passed via the constructor.
Ultimately, adding a property to a concrete class has no impact on the exposed interface. Since a constructor is an implementation detail, by corollary Inspection Properties are also implementation details. While they don't break encapsulation, they are only part of the concrete class. At the interface level, they are invisible. Interfaces are general, but concrete types are specific.
Unit testing #
The API design philosophy is easy to understand, but what does that mean for unit testing? The great thing is that it's possible to test each part of the whole in isolation, and then subsequently prove that parts correctly interact.
Consider the Discount class. It's easy to prove that the injected amount is properly exposed as a property:
[Theory]
[InlineData(1)]
[InlineData(2)]
public void AmountIsCorrect(int expected)
{
    var sut = new Discount(expected);
    var actual = sut.Amount;
    Assert.Equal(expected, actual);
}
Now, that's not particularly interesting in itself, but it's a small part of a larger whole. In the big picture, the concrete class is invisible, but the interfaces it implements are important. In this example, it must implement the IBasketElement interface. That's also easy to prove:
[Fact]
public void SutIsBasketElement()
{
    var sut = new Discount();
    Assert.IsAssignableFrom<IBasketElement>(sut);
}
The above fact only states that Discount implements IBasketElement, but not that it correctly implements it. One last test verifies that this is, indeed, the case:
[Fact]
public void AcceptReturnsCorrectResponse()
{
    var expected = new Mock<IBasketVisitor>().Object;
    var sut = new Discount();

    var visitorStub = new Mock<IBasketVisitor>();
    visitorStub.Setup(v => v.Visit(sut)).Returns(expected);
    var actual = sut.Accept(visitorStub.Object);

    Assert.Same(expected, actual);
}
This test verifies that the Accept method is correctly implemented. It sets up visitorStub in such a way that it'll only return expected if sut is passed to the Visit method. The actual value returned by the Accept method must be the same as the expected value.
Given these tests, the implementation must look something like this:
public class Discount : IBasketElement
{
    private readonly decimal amount;

    public Discount(decimal amount)
    {
        this.amount = amount;
    }

    public IBasketVisitor Accept(IBasketVisitor visitor)
    {
        return visitor.Visit(this);
    }

    public decimal Amount
    {
        get { return this.amount; }
    }
}
With these tests in place, you can pretty much forget about the Discount class. It has appropriate concrete behavior and correctly implements the IBasketElement protocol. You can write similar tests for all other classes that implements IBasketElement.
That may still seem trivial, but it begins to become interesting when you consider that a Basket is simply a collection of IBasketElement instances. That enables you to write this (Behavior Verification) test:
[Fact]
public void AcceptReturnsCorrectResult()
{
    // Fixture setup
    var v1 = new Mock<IBasketVisitor>().Object;
    var v2 = new Mock<IBasketVisitor>().Object;
    var v3 = new Mock<IBasketVisitor>().Object;
    var e1Stub = new Mock<IBasketElement>();
    var e2Stub = new Mock<IBasketElement>();
    e1Stub.Setup(e => e.Accept(v1)).Returns(v2);
    e2Stub.Setup(e => e.Accept(v2)).Returns(v3);

    var sut = new Basket(e1Stub.Object, e2Stub.Object);
    // Exercise system
    var actual = sut.Accept(v1);
    // Verify outcome
    Assert.Same(v3, actual);
    // Teardown
}
That may look difficult, but it simply states that when the Accept method is invoked with v1, it will pass v1 to the first IBasketElement, and the return value will be v2, which is then passed to the second IBasketElement, which returns v3, which is the last result and thus expected to be returned by the Basket instance itself. This works for all Mock<IBasketVisitor>.Object instances, so according to the Liskov Substitution Principle, it will work for any IBasketVisitor that conforms to the protocol.
In other words: because you know that Discount correctly implements IBasketElement, you are guaranteed that if there's a Discount element in a basket, it will call any visitor's Visit(Discount) method. This puts you in a position to implement an IBasketVisitor to calculate the total for the basket.
A BasketTotalVisitor must correctly implement all Visit methods defined by the IBasketVisitor interface and accumulate a total. However, whenever it encounters a Discount, it must subtract the discount from the total. Because BasketTotalVisitor is only a small part of a complex whole, this is easy to test:
[Theory]
[InlineData(1, 1)]
[InlineData(2, 1)]
[InlineData(3, 2)]
public void VisitDiscountReturnsCorrectResult(
    int initialTotal,
    int discount)
{
    var sut = new BasketTotalVisitor(initialTotal);

    var actual = sut.Visit(new Discount(discount));

    var btv = Assert.IsAssignableFrom<BasketTotalVisitor>(actual);
    Assert.Equal(initialTotal - discount, btv.Total);
}
Notice how this test uses Structural Inspection by verifying that the returned IBasketVisitor is, indeed, a BasketTotalVisitor instance, which has a Total property that the test verifies matches the expected value. It can only do that because the concrete BasketTotalVisitor class exposes the Total property.
Verifying the whole #
You can keep on working like this: establishing that the behavior of each small part follows the correct protocols. Once all fine-grained building blocks are in place, the only thing left to do is to verify that they are correctly composed. This is where Structural Inspection is very powerful. This is how you can verify that a BasketPipeline will have the correct behavior:
[Fact]
public void SutCorrectlyConvertsToPipe()
{
    CompositePipe<Basket> sut = new BasketPipeline();

    var visitors = sut
        .Cast<BasketVisitorPipe>()
        .Select(bvp => bvp.Visitor);

    var dv = Assert.IsAssignableFrom<VolumeDiscountVisitor>(visitors.First());
    Assert.Equal(500, dv.Threshold);
    Assert.Equal(.05m, dv.Rate);

    var vv = Assert.IsAssignableFrom<VatVisitor>(visitors.ElementAt(1));
    Assert.Equal(.25m, vv.Rate);

    var btv = Assert.IsAssignableFrom<BasketTotalVisitor>(visitors.Last());
}
This may look like a verbose test, but it's actually quite information-dense.
First, the BasketPipeline is a CompositePipe<Basket>, and while I haven't shown that part in this article, I know from other unit tests that this class adheres to the Liskov Substitution Principle, so if the test can verify that its content is correct, the composed behavior must also be correct.
In this test case, you can project all the contained pipes into the visitors they adapt. This is only possible because the concrete class BasketVisitorPipe exposes the concrete Visitor property. This is Structural Inspection in action.
The BasketPipeline should be able to apply a volume discount, calculate VAT and the total. Because all the small parts have the correct behavior, you only need to verify that the BasketPipeline has the correct structure.
A business rule states that a volume discount of five percent should be applied if the total value of all basket items is 500 or more. This means that the first visitor should be a VolumeDiscountVisitor, and its threshold should be 500 and the rate .05. You can use Structural Inspection to verify that this is the case.
A legal requirement is that a VAT rate of 25 percent (real Danish VAT rate) should be applied to the value of the basket. This means that the next visitor should be a VatVisitor, and its rate should be .25 .
Finally, the total price for the basket, including discounts and VAT should be calculated. This means that the last visitor should be a BasketTotalVisitor.
The test verifies the structure of the API's Facade, and because the Facade has the correct structure and previous tests have proven that all the parts have the correct behavior, the Facade must have the desired higher-order behavior.
In order to write this article, I TDD'ed all the code presented here (and more), and I deliberately didn't try to apply the BasketPipeline to some Basket instances until I had all the structure in place. Once I had that, I wrote a few Facade Tests as sanity checks, and they all passed in the first attempt.
Conclusion #
Structural Inspection is a useful technique when you need to unit test a complex system, and you need a high degree of confidence that everything works correctly. It's not the only option available to you. Another option is to use Triangulation with a large set of Facade Tests, but there may come a time where the number of test cases required to exercise all possible combinations of business rules becomes so large that Structural Inspection may be a better alternative.
The code I wrote for this article contains 136 test cases, distributed over 88 test methods. It has 100 percent code coverage, and it covers 67 members over 11 classes and 3 interfaces. That's probably too enterprisey for a simple shopping basket calculation that only does volume discounts, VAT and total calculation. However, the way I've modeled this Basket API is quite extensible, so it may be quite well-suited for complex shopping baskets that might include various sorts of inclusive and exclusive discounts, VAT rates that are dependent on the category of goods in the basket, or that may be dependent on the shipping destination. Add to that calculation of shipping rates based on shipping origin and destination, as well as various characteristics (weight, volume, etc.) of the items in the basket, and Structural Inspection starts to look attractive.
Resources #
For more details:
- My Pluralsight course Advanced Unit Testing contains an entire 35 minute module on Structural Inspection. The course also comes with full source code.
- My NDC 2013 talk Faking Homoiconicity in C# with graphs approaches the same subject from a different angle.
Why trust tests?
Tests are trustworthy if they are simple and you've seen them fail.
When I started out with TDD some ten years ago, it was really hard to convince programmers that unit testing was valuable. It's better today, but much software is still produced without test coverage. One of the most common arguments for unit tests is to ask the question: "How do you know that your code works?"
That's a darn good question, and one of the best answers is that you should cover the code with automated tests (unit tests).
Okay, then: How do you know that your unit tests work?
A test watches the correctness of the SUT, but who watches the watchmen? Should you write some more unit tests to test your unit tests? Is it going to be turtles all the way down?
Obviously, that's not what we do. Then why do we trust unit tests?
I think that there's two different reasons for that:
- They are easy to review
- We've seen them fail
Review #
The reason that a lot of code fails to do what you think it does is because it's complicated. Sometimes there's also going to be subtle bugs, but I think that the most common problem is that as the code becomes more involved, it becomes more difficult for you to hold it in your brain. A simple Hello World application is easy to understand. Typical software isn't.
Unit tests tend to be a lot simpler. First of all, unit tests should be deterministic. This means that there should be a clear path through each test case. In other words, a unit test should have a Cyclomatic Complexity of 1.
If you follow the AAA or Four-Phase Test patterns, keep the Cyclomatic Complexity at 1, keep the total line count down, and use good names, you should have a readable test case. Such test code is easy to review for correctness. If you are Pair Programming, you and your partner review the unit test code as you write it. If you use other review mechanisms (e.g. pull requests), the reviewer can review your unit test code. Even if you have no other person reviewing your code, keeping it simple helps you understand what it is that you do. Ultimately, it can't be more error prone than single-handedly writing production code without tests.
Part of the reason why we trust unit tests is because, if written well, they are easy to review for correctness.
See the test fail #
Deeply ingrained into proper TDD is the Red/Green/Refactor cycle. It's extremely important to see the test fail. Personally, I'm saved by this rule about once a week. I write a test and run it, and much to my surprise it turns out to be a false negative. Although I've been doing TDD for some ten years, this still happens to me regularly, so I think it's one of those rigid rules you should always follow. Seeing the test fail verifies that the test indeed tests something.
This is also the reason why, if you don't do TDD, but rather write tests after the fact, it becomes extremely important to follow a proper procedure for writing Characterization Tests.
Part of the reason that we trust unit tests is that we've seen them fail. It's like double-entry bookkeeping. The tests keep the SUT in place, and the SUT makes the tests pass.
Append-only tests #
Both of the reasons I've provided are focused on the test as it's being created. At that time, you see it fail and you review it for correctness. As time goes by, you should end up with a test suite with lots of tests. Do you ever look at those tests?
You trust them because they were correct when they were created. Are they still correct today?
Well, they probably are if you never again touched them, but every time you modify a test case, you make it just a little less trustworthy. Similar in spirit to the Open/Closed Principle, a test suite should be open for extension, but closed for modification. Trustworthy test suites are append-only.
Listen to trivial tests
Listen to your tests. If it's too much bother writing a test for a property, perhaps it's telling you that you don't need a property there.
A couple of days ago I published a blog post that caused some people to react, telling me that I'm wrong. That's most certainly a possibility, but what if I'm not? In this post I'd like to provide a bit of background on why I wrote that previous post, and where it may lead us.
Craftmanship #
My blog post was a reaction to Robert C. Martin's post on The Pragmatics of TDD. One of the qualities I've always appreciated of people like Robert C. Martin and Martin Fowler is that they consistently explain the reasoning behind their actions. The part of The Pragmatics of TDD that caused me to react was that it contains practices that aren't explained.
Notice that Robert C. Martin takes time to explain why he doesn't unit test UI code (too much fiddling is involved). To me, that's a fully satisfactory explanation, so I didn't react against that at all. On the other hand, he states that he doesn't write tests against obviously trivial members, but no satisfactory explanation is given.
Robert C. Martin has been programming for more than 40 years, and been doing TDD longer than me, so I have no doubt that this pragmatic approach works for him (as well as for many of the people who disagree with my previous post). However, if, for the sake of argument, we accept the Dreyfus model of skill acquisition, Robert C. Martin is clearly an Expert. He uses intuition and tacit knowledge to make appropriate decisions. Normally, as in Clean Code, he does a great job of making this tacit knowledge explicit, but in this case I found the explanation was missing, so I wanted to explore that question.
Perhaps I was a bit high on laying out a logical argument. Yesterday, my wife (who's not at all a programmer) kindly read through the article and let me know that my language could have been less aggressive. It could, and I apologize if I offended anyone - particularly Robert C. Martin from whom I've learned so much.
Most of all, though, I think I could have stated my motivation and context clearer.
As I have previously stated on Twitter, I have come to the realization that I'm a Programmer more than I'm a Developer. While I love software, I love code more. If you ask my past employers and customers, they will tell you that I can get stuff done, too. However, I often code just to learn. This is an aspect of Software Craftmanship that is sometimes overlooked: Yes, we want to ship working software. However, we must always strive to become better at our craft, and that means practice. That means writing code for code's sake. That means obsessing over details.
It also means thinking about aspects of programming that many people take for granted, such as properties.
Tests provide feedback #
Several people attacked my previous post because they think it's not practical and that it puts TDD in a bad light. Actually, I think it puts TDD in a splendid light because it made me explicitly realize something that I've implicitly 'known' for a long time: we use way too many properties in our code.
As always, we should take to heart the advice from GOOS: Listen to your tests.
If you think that it's ridiculous to write tests for automatic properties, then what is the feedback really about?
Most of my critics present the choices like this:
| Unit test | No unit test | |
|---|---|---|
| Property |
However, I think the choice is more like this:
| Unit test | No unit test | |
|---|---|---|
| Property | ||
| No property |
In his post on the Pragmatics of TDD, Robert C. Martin states that getters and setters (properties) will be indirectly covered by other tests. This would also be true for public fields. This is even more pronounced in C# where the syntax for accessing a property is identical to the syntax for accessing a field.
I agree with both Robert C. Martin and Mark Rendle that in a lot of cases, we don't really care about anything as nitty-gritty as a single property. What we often care about is the overall behavior of a system. This is also the approach I teach in my Pluralsight course on Outside-In Test Driven Development. You don't see me write tests of properties there.
However, I made a mistake in that course, and another mistake in my previous post, and that was to design View Models with properties. Why are we even adding properties to View Models? The purpose of a View Model is to render in a particular way, either as UI, XML, JSON or something else. We care about the end result, not what the View Model class looks like. At the boundaries, applications aren't object-oriented.
The JournalEntryModel from my Pluralsight course should really have look like this:
public class JournalEntryModel
{
    public DateTimeOffset Time;

    public int Distance;

    public TimeSpan Duration;
}
Notice that the class simply holds three public fields. This produces the same JSON as the version where those three members are properties.
Summary #
There may still be cases where properties are appropriate. If, for example, instead of writing an end-to-end application, you are writing a reusable library, properties provide encapsulation. In such cases, the property has a particular purpose, and it still makes sense to me to capture that behavior (yes: behavior, not data) in a regression test.
However, most of the times properties aren't warranted, and you might as well use a public field - this is the YAGNI principle applied. You don't have to test public fields because they can't possibly have any behavior.
Comments
In my opinion disciplines like TDD fall under a precise science and giving arbitrary rules to follow could be misleading.
Totally agree with Mark Seemann, tests give us control. I dare add that also a bad wrote test give us information; for example it can put in evidence a code smell in the system under test.
This discussion remind me a Stack Overflow question, How deep are your unit tests?.
It's interesting how Kent Beck start replying I get paid for code that works, not for tests...
In conclusion writing good test code and applying TDD is finalized to prove the correctness of a system.
It's a science; a lot of good literature (as books quoted here) and we can't rely on bunch of practical points.
I don't understand your line of reasoning. If I understand you correctly, you're saying auto-properties should be tested, because they might be later changed to properties with some behavior. And you're also saying that it might be a good idea to use public fields instead of auto-properties, because you don't have to test those. But public fields might also be changed to properties with behavior later.
In other words, I don't really see the distinction between public fields and auto-properties. Either you should test both, or neither. But it doesn't make much sense to me to test auto-properties, but not public fields.
Also, one thing you ommited is that auto-properties can have private setters. I think that's extremely useful and it's something public fields can't do. But, according to your reasoning, those should be tested too, using trivial tests. What does listening to those tests say?
Auto-mocking Container
A unit test pattern
This article describes a unit test pattern called an Auto-mocking Container. It can be used as a solution to the problem:
How can unit tests be decoupled from Dependency Injection mechanics?
By using a heuristic composition engine to compose dynamic Test Doubles into the System Under Test
A major problem with unit tests is to make sure that they are robust in the face of a changing system. One of the most common problems programmers have with unit tests is the so-called Fragile Test smell. Every time you attempt to refactor your code, tests break.
There are various reasons why that happens and the Auto-mocking Container pattern does not help in all cases, but a common reason that tests break is when you change the constructor of your System Under Test (SUT). In such cases, the use of an Auto-mocking Container can help.
How it works #
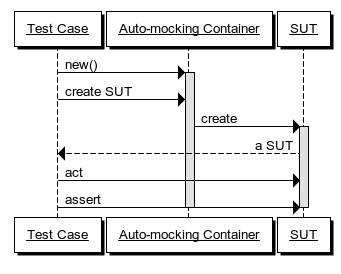
In order to decouple a unit test from the mechanics of creating an instance of the SUT, the test code can repurpose a Dependency Injection (DI) Container to compose it. The DI Container must be customizable to the extent that it can automatically compose dynamic Test Doubles (mocks/stubs) into the SUT.
It's important to notice that this technique is a pure unit testing concern. Even if you use an Auto-mocking Container in your unit test, you don't have to use a DI Container in your production code - or you can use a different DI Container than the one you've chosen to repurpose as an Auto-mocking Container.
When a test case wants to exercise the SUT, it needs an instance of the SUT. Instead of creating the SUT directly by invoking its constructor, the test case uses an Auto-mocking Container to create the SUT instance. The Auto-mocking Container automatically supplies dynamic mocks in place of all the SUT's dependencies, freeing the test writer from explicitly dealing with this concern.
This decouples each test case from the mechanics of how the SUT is created, making the test more robust. Even if the SUT's constructor is refactored, the test case remains unimpacted because the Auto-mocking Container dynamically deals with the changed constructor signature.
When to use it #
Use an Auto-mocking Container when you are unit testing classes which utilize DI (particularly Constructor Injection). In a fully loosely coupled system, constructors are implementation details, which means that you may decide to change constructor signatures as part of refactoring.
Particularly early in a code base's lifetime, the system and its internal design may be in flux. In order to enable refactoring, it's important to be able to change constructor signatures without worrying about breaking tests. In such cases, an Auto-mocking Container can be of great help.
In well-established code bases, introducing an Auto-mocking Container is unlikely to be of much benefit, as the code is assumed to be more stable.
Auto-mocking Containers are also less ideally suited for code-bases which rely more on a functional programming style with Value Objects and data flow algorithms, and less on DI.
Implementation details #
Use an existing DI Container, but repurpose it as an Auto-mocking Container. Normal DI Containers don't serve dynamic mock objects by default, so you'll need to pick a DI Container which is sufficiently extensible to enable you to change its behavior as desired.
In order to extend the DI Container with the ability to serve dynamic mock objects, you must also pick a suitable dynamic mock library. The Auto-mocking Container is nothing more than a 'Glue Library' that connects the behavior of the DI Container with the behavior of the dynamic mock library.
Some open source projects exist that provide pre-packaged Glue Libraries as Auto-mocking Containers by combining two other libraries, but with good DI Containers and dynamic mock libraries, it's a trivial effort to produce the Auto-mocking Container as part of the unit test infrastructure.
Motivating example #
In order to understand how unit tests can become tightly coupled to the construction mechanics of SUTs, imagine that you are developing a simple shopping basket web service using Test-Driven Development (TDD).
To keep the example simple, imagine that the shopping basket is going to be a CRUD service exposed over HTTP. The framework you've chosen to use is based on the concept of a Controller that handles incoming requests and serves responses. In order to get started, you write the first (ice breaker) unit test:
[Fact]
public void SutIsController()
{
    var sut = new BasketController();
    Assert.IsAssignableFrom<IHttpController>(sut);
}
This is a straight-forward unit test which prompts you to create the BasketController class.
The next thing you want to do is to enable clients to add new items to the basket. In order to do so, you write the next test:
[Fact]
public void PostSendsCorrectEvent()
{
    var channelMock = new Mock<ICommandChannel>();
    var sut = new BasketController(channelMock.Object);

    var item = new BasketItemModel { ProductId = 1234, Quantity = 3 };
    sut.Post(item);

    var expected = item.AddToBasket();
    channelMock.Verify(c => c.Send(expected));
}
In order to make this test compile you need to add this constructor to the BasketController class:
private ICommandChannel channel;

public BasketController(ICommandChannel channel)
{
    this.channel = channel;
}
However, this breaks the first unit test, and you have to go back and fix the first unit test in order to make the test suite compile:
[Fact]
public void SutIsController()
{
    var channelDummy = new Mock<ICommandChannel>();
    var sut = new BasketController(channelDummy.Object);
    Assert.IsAssignableFrom<IHttpController>(sut);
}
In this example only a single unit test broke, but it gets progressively worse as you go along.
Satisfied with your implementation so far, you now decide to implement a feature where the client of the service can read the basket. This is supported by the HTTP GET method, so you write this unit test to drive the feature into existence:
[Fact]
public void GetReturnsCorrectResult()
{
    // Arrange
    var readerStub = new Mock<IBasketReader>();
    var expected = new BasketModel();
    readerStub.Setup(r => r.GetBasket()).Returns(expected);

    var channelDummy = new Mock<ICommandChannel>().Object;
    var sut = new BasketController(channelDummy, readerStub.Object);

    // Act
    var response = sut.Get();
    var actual = response.Content.ReadAsAsync<BasketModel>().Result;

    // Assert
    Assert.Equal(expected, actual);
}
This test introduces yet another dependency into the SUT, forcing you to change the BasketController constructor to this:
private ICommandChannel channel;
private IBasketReader reader;

public BasketController(ICommandChannel channel, IBasketReader reader)
{
    this.channel = channel;
    this.reader = reader;
}
Alas, this breaks both previous unit tests and you have to revisit them and fix them before you can proceed.
In this simple example, fixing a couple of unit tests in order to introduce a new dependency doesn't sound like much, but if you already have hundreds of tests, the prospect of breaking dozens of tests each time you wish to refactor by moving dependencies around can seriously hamper your productivity.
Refactoring notes #
The problem is that the tests are too tightly coupled to the mechanics of how the SUT is constructed. The irony is that although you somehow need to create instances of the SUT, you shouldn't really care about how it happens.
If you closely examine the tests in the motivating example, you will notice that the SUT is created in the Arrange phase of the test. This phase of the test is also called the Fixture Setup phase; it's where you put all the initialization code which is required before you can interact with the SUT. To be brutally honest, the code that goes into the Arrange phase is just a necessary evil. You should care only about the Act and Assert phases - after all, these tests don't test the constructors. In other words, what happens in the Arrange phase is mostly incidental, so it's unfortunate if that part of a test is holding you back from refactoring. You need a way to decouple the tests from the constructor signature, while still being able to manipulate the injected dynamic mock objects.
There are various ways to achieve that goal. A common approach is to declare the SUT and its dependencies as class fields and compose them all as part of a test class' Implicit Setup . This can be an easy way to address the issue, but carries with it all the disadvantages of the Implicit Setup pattern. Additionally, it can lead to an explosion of fields and low cohesion of the test class itself.
Another approach is to build the SUT with a helper method. However, if the SUT has more than one dependency, you may need to create a lot of overloads of such helper methods, in order to manipulate only the dynamic mocks you may care about in a given test case. This tends to lead towards the Object Mother (anti-)pattern.
A good alternative is an Auto-mocking Container to decouple the tests from the constructor signature of the SUT.
Example: Castle Windsor as an Auto-mocking Container #
In this example you repurpose Castle Windsor as an Auto-mocking Container. Castle Windsor is one among many DI Containers for .NET with a pretty good extensibility model. This can be used to turn the standard WindsorContainer into an Auto-mocking Container. In this case you will combine it with Moq in order to automatically create dynamic mocks every time you need an instance of an interface.
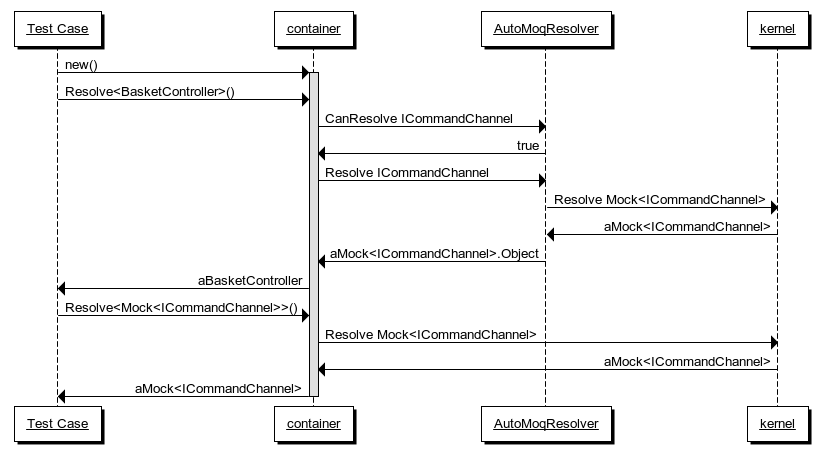
It only takes two small classes to make this happen. The first class is a so-called SubDependencyResolver that translates requests for an interface into a request for a mock of that interface:
public class AutoMoqResolver : ISubDependencyResolver
{
    private readonly IKernel kernel;

    public AutoMoqResolver(IKernel kernel)
    {
        this.kernel = kernel;
    }

    public bool CanResolve(
        CreationContext context,
        ISubDependencyResolver contextHandlerResolver,
        ComponentModel model,
        DependencyModel dependency)
    {
        return dependency.TargetType.IsInterface;
    }

    public object Resolve(
        CreationContext context,
        ISubDependencyResolver contextHandlerResolver,
        ComponentModel model,
        DependencyModel dependency)
    {
        var mockType = typeof(Mock<>).MakeGenericType(dependency.TargetType);
        return ((Mock)this.kernel.Resolve(mockType)).Object;
    }
}
The ISubDependencyResolver interface is a Castle Windsor extensibility point. It follows the Tester-Doer pattern, which means that the WindsorContainer will first call the CanResolve method, and subsequently only call the Resolve method if the return value from CanResolve was true.
In this implementation you return true if and only if the requested dependency is an interface. When this is the case, you construct a generic type of Moq's Mock<T> class. For example, in the code above, if dependency.TargetType is the interface ICommandChannel, the mockType variable becomes the type Mock<ICommandChannel>.
The next line of code asks the kernel to resolve that type (e.g. Mock<ICommandChannel>). The resolved instance is cast to Mock in order to access and return the value of its Object property. If you ask the kernel for an instance of Mock<ICommandChannel>, it'll return an instance of that type, and its Object property will then be an instance of ICommandChannel. This is the dynamic mock object you need in order to compose a SUT with automatic Test Doubles.
The other class wires everything together:
public class ShopFixture : IWindsorInstaller
{
    public void Install(
        IWindsorContainer container,
        IConfigurationStore store)
    {
        container.Kernel.Resolver.AddSubResolver(
            new AutoMoqResolver(
                container.Kernel));
        container.Register(Component
            .For(typeof(Mock<>)));

        container.Register(Classes
            .FromAssemblyContaining<Shop.MvcApplication>()
            .Pick()
            .WithServiceSelf()
            .LifestyleTransient());
    }
}
This is an IWindsorInstaller, which is simply a way of packaging Castle Windsor configuration together in a class. In the first line you add the AutoMoqResolver. In the next line you register the open generic type Mock<>. This means that the WindsorContainer knows about any generic variation of Mock<T> you might want to create. Recall that AutoMockResolver asks the kernel to resolve an instance of Mock<T> (e.g. Mock<ICommandChannel>). This registration makes this possible.
Finally, the ShopFixture scans through all public types in the SUT assembly and registers their concrete types. This is all it takes to turn Castle Windsor into an Auto-mocking Container.
Once you've done that, you can start TDD'ing, and you should rarely (if ever) have to go back to the ShopFixture to tweak anything.
The first test you write is equivalent to the first test in the previous motivating example:
[Fact]
public void SutIsController()
{
    var container = new WindsorContainer().Install(new ShopFixture());
    var sut = container.Resolve<BasketController>();
    Assert.IsAssignableFrom<IHttpController>(sut);
}
First you create the container and install the ShopFixture. This is going to be the first line of code in all of your tests.
Next, you ask the container to resolve an instance of BasketController. At this point there's only a default constructor, so Auto-mocking hasn't even kicked in yet, but you get an instance of the SUT against which you can make your assertion.
Now it's time to write the next test, equivalent to the second test in the motivating example:
[Fact]
public void PostSendsCorrectEvent()
{
    var container = new WindsorContainer().Install(new ShopFixture());
    var sut = container.Resolve<BasketController>();

    var item = new BasketItemModel { ProductId = 1234, Quantity = 3 };
    sut.Post(item);

    var expected = item.AddToBasket();
    container
        .Resolve<Mock<ICommandChannel>>()
        .Verify(c => c.Send(expected));
}
Here an interesting thing happens. Notice that the first two lines of code are the same as in the previous test. You don't need to define the mock object before creating the SUT. In fact, you can exercise the SUT without ever referencing the mock.
In the last part of the test you need to verify that the SUT interacted with the mock as expected. At that time you can ask the container to resolve the mock and verify against it. This can be done in a single method call chain, so you don't even have to declare a variable for the mock.
This is possible because the ShopFixture registers all Mock<T> instances with the so-called Singleton lifestyle. The Singleton lifestyle shouldn't be confused with the Singleton design pattern. It means that every time you ask a container instance for an instance of a type, you will get back the same instance. In Castle Windsor, this is the default lifestyle, so this code:
container.Register(Component
    .For(typeof(Mock<>)));
is equivalent to this:
container.Register(Component
    .For(typeof(Mock<>))
    .LifestyleSingleton());
When you implement the Post method on BasketController by injecting ICommandChannel into its constructor, the test is going to pass. This is because when you ask the container to resolve an instance of BasketController, it will need to first resolve an instance of ICommandChannel.
This is done by the AutoMoqResolver, which in turn asks the kernel for an instance of Mock<ICommandChannel>. The Object property is the dynamically generated instance of ICommandChannel, which is injected into the BasketController instance ultimately returned by the container.
When the test case subsequently asks the container for an instance of Mock<ICommandChannel> the same instance is reused because it's configured with the Singleton lifestyle.
More importantly, while the second test prompted you to change the constructor signature of BasketController, this change didn't break the existing test.
You can now write the third test, equivalent to the third test in the motivating example:
[Fact]
public void GetReturnsCorrectResult()
{
    var container = new WindsorContainer().Install(new ShopFixture());
    var sut = container.Resolve<BasketController>();
    var expected = new BasketModel();
    container.Resolve<Mock<IBasketReader>>()
        .Setup(r => r.GetBasket())
        .Returns(expected);

    var response = sut.Get();
    var actual = response.Content.ReadAsAsync<BasketModel>().Result;

    Assert.Equal(expected, actual);
}
Once more you change the constructor of BasketController, this time to inject an IBasketReader into it, but none of the existing tests break.
This example demonstrated how to repurpose Castle Windsor as an Auto-mocking Container. It's important to realize that this is still a pure unit testing concern. It doesn't require you to use Castle Windsor in your production code.
Other DI Containers can be repurposed as Auto-mocking Containers as well. One option is Autofac, and while not strictly a DI Container, another option is AutoFixture.
This article first appeared in the Open Source Journal 2012 issue 4. It is reprinted here with kind permission.
Comments
First of all, thank you for a very informative article.
I'd like to call out another example of an Auto Mocking Container that I've picked up recently and enjoyed working with. It's built into Machine.Fakes, an MSpec extension library that abstracts the details of different mocking libraries behind an expressive API.
I rewrote the third test with MSpec and Machine.Fakes to demonstrate its usage:
public class When_sending_an_http_get_request : WithSubject<BasketController>
{
    private static BasketModel expectedContent;
    private static HttpResponseMessage response;

    Establish context = () =>
    {
        expected = new BasketModel();
        The<IBasketReader>()
            .WhenToldTo(r => r.GetBasket())
            .Return(expectedContent);
    }

    Because of = () =>
        response = Subject.Get();

    It should_return_a_successful_http_response = () =>
        response.IsSuccessfulStatusCode.ShouldBeTrue();

    It should_return_the_contents_of_the_basket = () =>
        response.ReadContentAs<BasketModel>().ShouldEqual(expectedContent);
}
There are a couple of interesting points to highlight here. The WithSubject<T> class hides the details of composing the SUT, which is then exposed through the Subject property. It makes sure that any dependencies are automatically fulfilled with Test Doubles, created by delegating to a mocking library of choice. Those singleton instances can then be obtained from the test using the inherited The<T>() to setup stubs or make assertions.
What I like about Machine.Fakes is that it gives me the advantages of using an Auto Mocking Container, while keeping the details of how the SUT is composed out of the test, thus allowing it to stay focused on the behavior to verify.

Comments
Thank you for sharing the great article. Recently I have been curious about how the structural instpection can work on funtional programming. Because funtion does not expose any properties to be inspected, I think that the only way to verify that whole thing correctly behaves is doing integration test.
I was wondering whether you had a good approach about it.
Thank you for writing. With functions, I've yet to find a good alternative to Structural Inspection, so I find myself writing more Integration Tests when I write F# code. On the other hand, because the F# type system is so much stronger than e.g. C#, I've also found that I can design data structures in such a way that illegal states become unrepresentable, and that again means that I need to write fewer unit tests than I would have to with F#.
Thus, even though I may have to write slightly more Integration Tests, I'm still quite happy with the trade-off.